Data Analyses
Introduction
The analyses of annotated files include the descriptive statistics, the filtering of the annotated data to get only the annotations you are interested in, see/edit the information about files, etc.
Like the other features of SPPAS, analyzing data can be performed in three different ways:
- the Application Programming Interface, in Python language;
- the Command-Line User Interface;
- the Graphical User Interface.
Among the features implemented in the API, a big majority are
included in the GUI, but just a few can be performed with the CLI. This
chapter then describes only the page Analyze
of the GUI.
The page Analyze of the GUI
The page Analyze
of the GUI is divided into two main areas: a
toolbar and a content to represent files.
Displayed files content
Each opened file is displayed in a panel in the content area. The next Figure indicates what panels of four different files look like. Panels of the annotated files have a yellow background, panels of the audio files are in blue color and panels of unknown files are pinky-red.
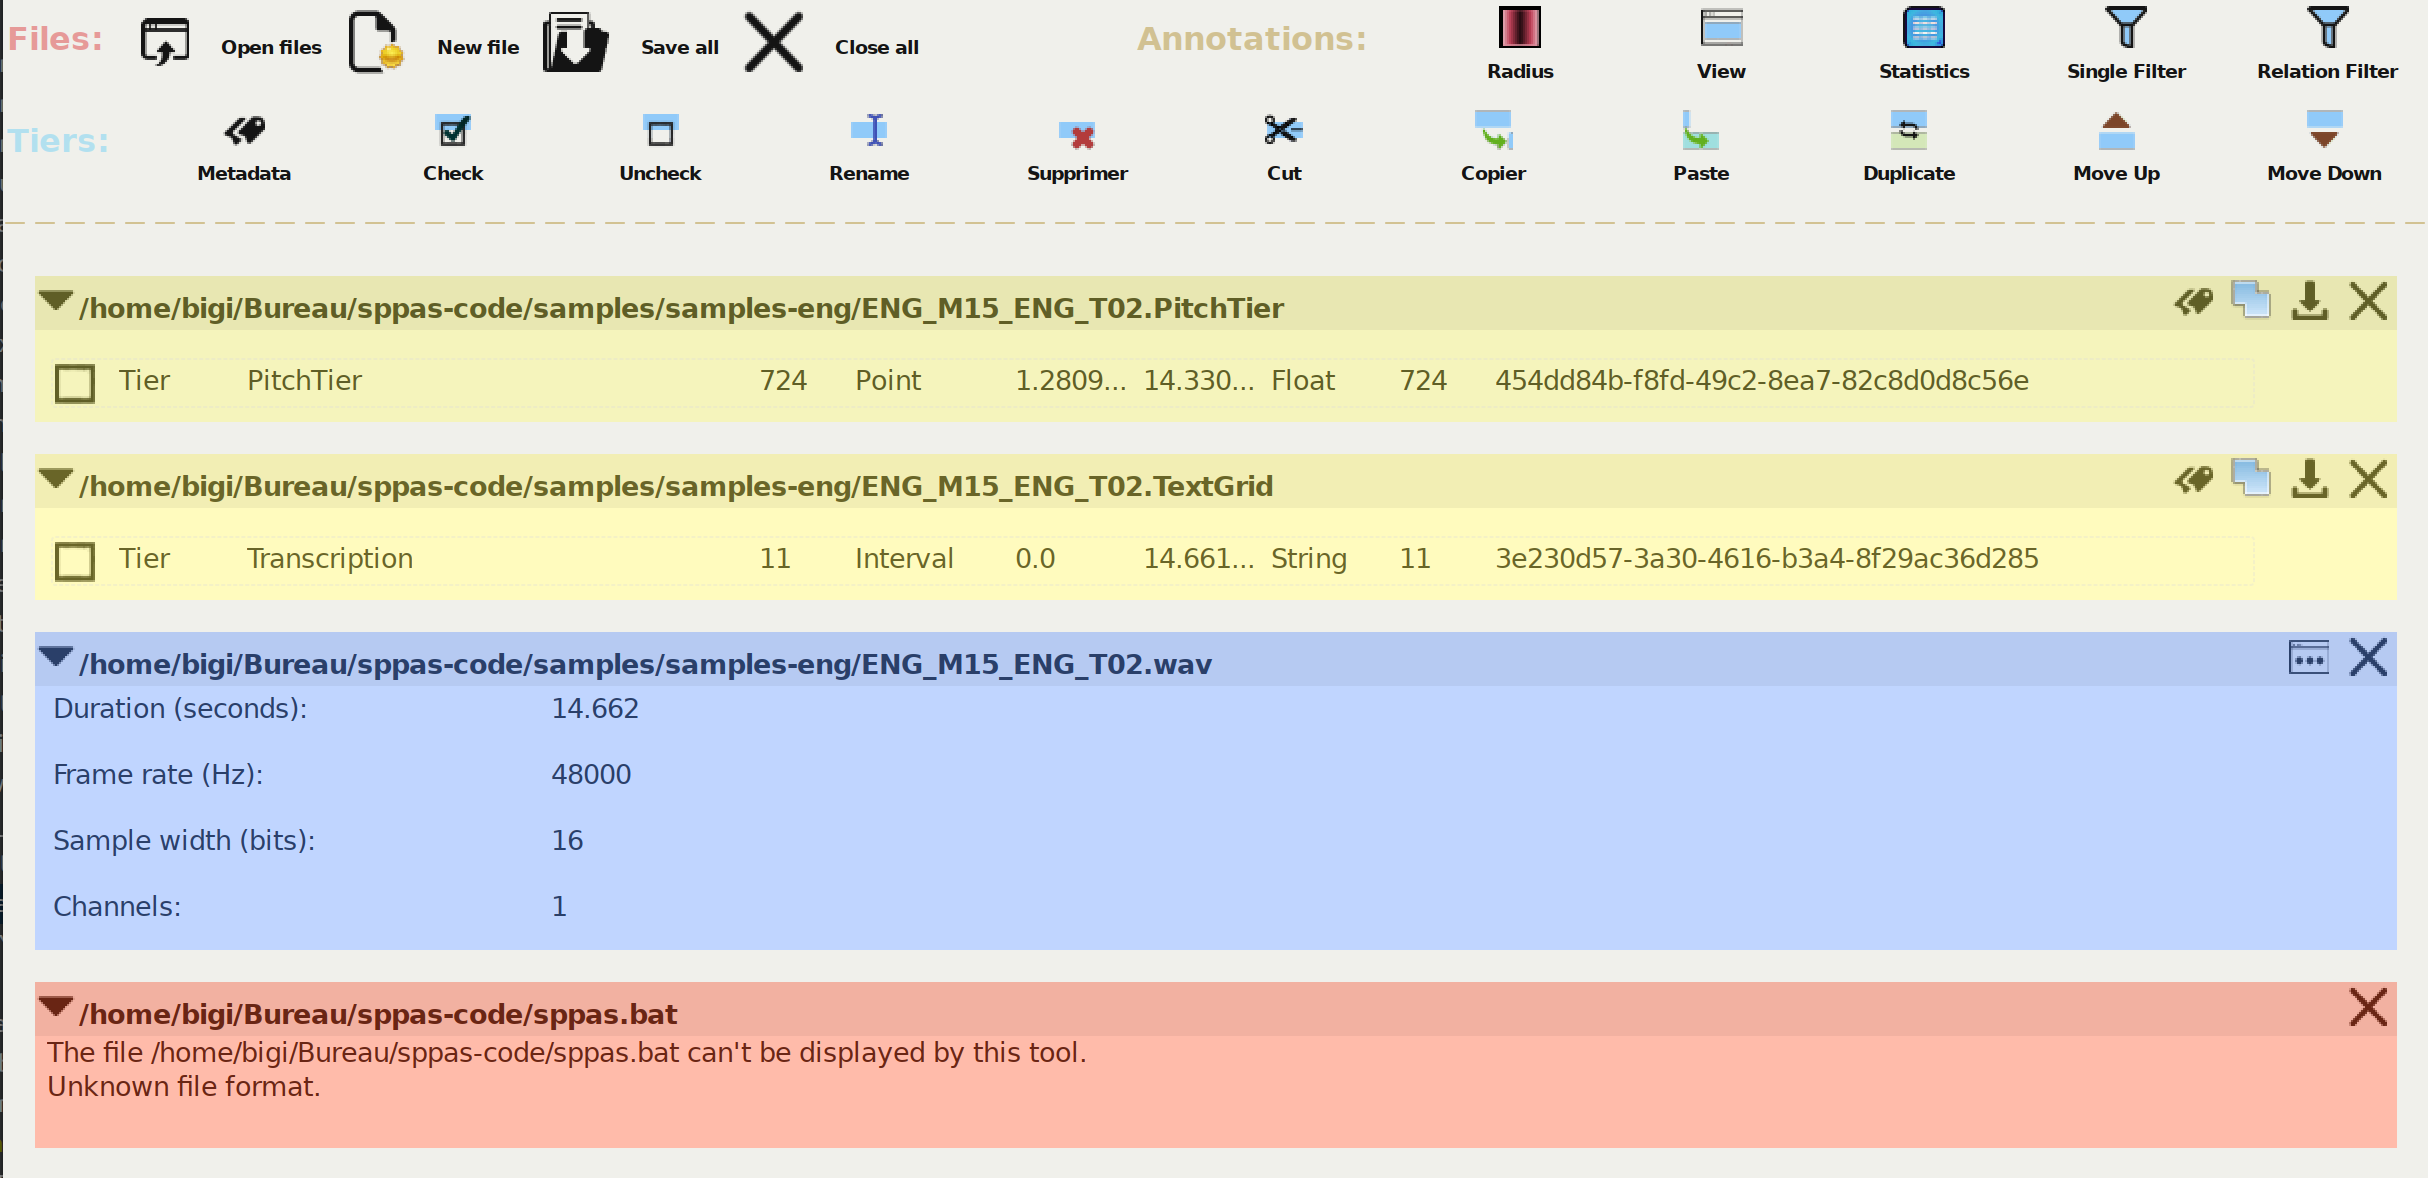
Some actions can be performed individually on the panel of a file. A mouse click on the filename or on the arrow at left will show or hide the content of the file.
For transcription files, the icons at top-right of the panel allow:
- editing the metadata of the file - notice that only the XRA file format allows saving the metadata;
- selecting the file (for example, it’s used to paste tiers into);
- saving the file - only if it has changed;
- closing the file and unlock it in the workspace.
For audio files, the icons at top-right of the panel allow:
- viewing audio content and manage channels - available only for files less than a few minutes;
- closing the file.
The toolbar
The toolbar of the page is made of three different parts:
Files:
click on these buttons to perform an action on the checked filenames of the pageFiles
;Tiers:
click on these buttons to perform an action on the checked tiers of the opened files;Annotations:
click on these buttons to analyze the annotations of the checked tiers, of the opened files.
Files: Open files
Open, load and display a panel for each checked file of the current workspace. Some files could need a long time to be loaded (like TextGrid files with a lot of annotations), so a scrollbar should indicate the progression. As soon as a file is opened, it is locked and no other page can perform an action on it.
To open new files, check new files in the current workspace and click
again on the Open files
button. The panels of the newly opened
files will be appended to the existing ones.
Files: New file
Click on this button to create a new annotated file. A dialog box will ask for a path/filename and for a file extension. The extension defines the file format; any of the supported file format can be used. The file will be created on disk when it is saved for the first time.
Files: Save all
Save all files for which some changes were done, without confirmation.
Files: Close all
Close all the opened files. If some files were changed and not saved, a dialog will ask for confirmation.
Tiers: Metadata
Open a dialog to edit the metadata of the checked tiers. Notice that most of the file format does not allow saving metadata, or it allows only some specific ones; only the XRA format can save any metadata.
Tiers: Check
A click on the Check
button will open a dialog to enter a tier
name, and it will check all tiers matching it. The entry is a regular
expression.
Tiers: Uncheck
A click on the Uncheck
button will un-check all tiers.
Tiers: Rename
A mouse click on the Rename
button will open a dialog to fix a
name of a tier and then to rename all checked tiers. If a file already
has a tier with the given name, an index number will be appended to
the new name.
Tiers: Delete
A mouse click on the Delete
button will delete all checked
tiers. This process is irreversible. To recover a deleted tier, the only
way is to close the file and to re-open it but all the unsaved changes
are lost.
Tiers: Cut/Copy/Paste
The Cut/Copy/Paste buttons make use of a clipboard to manage tiers.
Tiers can then be copied from files to other ones. The files to paste in
must be selected first with the select
button of the individual
panels.
Tiers: Duplicate
The duplicate button is designed to copy/paste a tier into the same file. The name of the duplicated tier will be the same as the original one with an index number at the end.
Tiers: Move Up/Move Down
These buttons allow moving checked tiers into a file.
Annotations: Radius
The Radius
button is to fix a radius for all the
annotation's localizations of the checked tiers, i.e., the
vagueness around the fixed point in time. Notice that only XRA file
format can save it.
Read the following paper for details:
Brigitte Bigi, Tatsuya Watanabe, Laurent Prévot (2014). Representing Multimodal Linguistics Annotated Data, 9th International conference on Language Resources and Evaluation (LREC), Reykjavik (Iceland), pages 3386-3392. ISBN: 978-2-9517408-8-4.
Annotations: View
Click the button View
to see all the annotations of the
checked tiers in a table.
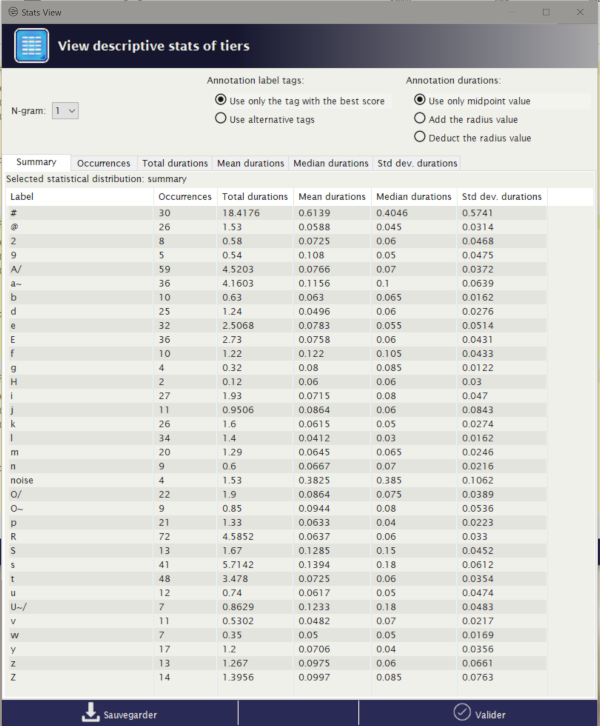
Annotations: Statistics
It can estimate the occurrences, the duration, ... of the annotations of the checked tiers, and allows saving results in CSV (for Excel, OpenOffice, R, MatLab,…).
It offers series of sheets organized in a notebook. The first tab is displaying descriptive statistics of the set of given tiers. The other tabs are indicating one of the statistics over the given tiers. The followings are estimated:
- occurrences: the number of observations
- total durations: the sum of the durations
- mean durations: the arithmetic mean of the duration
- median durations: the median value of the distribution of durations
- std dev. durations: the standard deviation value of the distribution of durations
All of them can be estimated on a single annotation label or on a
series of them. The length of this context can be optionally changed
while fixing the N-gram
value (available from 1 to 5), just above
the sheets.
Each displayed sheet can be saved as a CSV file, which is a useful
file format to be read by R, Excel, OpenOffice, LibreOffice, and so… To
do so, display the sheet you want to save and click on the button
Save sheet
, just below the sheets. If you plan to open this CSV
file with Excel under Windows, it is recommended to change the encoding
to UTF-16. For the other cases, UTF-8 is probably the most relevant.
The annotation durations are commonly estimated on the Midpoint
value, without taking the radius into account; see (Bigi et al., 2012)
for explanations about the Midpoint/Radius. Optionally, the duration can
either be estimated by taking the vagueness into account, then check
Add the radius value
button, or by ignoring the vagueness and
estimating only on the central part of the annotation, then check
Deduct the radius value
.
For those who are estimating statistics on XRA files, you can either estimate stats only on the best label (the label with the higher score) or on all labels, i.e., the best label and all its alternatives (if any).
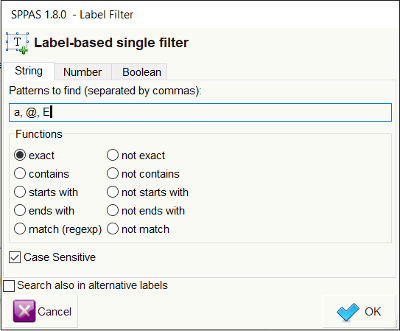
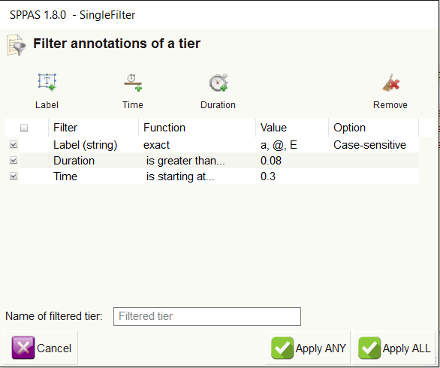
Annotations: Single filter
Define your filters to create new tiers with only the annotations you are interested in!
Pattern selection is an important part to extract data of a corpus and is obviously and important part of any filtering system. Thus, if the label of an annotation is a string, the following filters are proposed in DataFilter:
- exact match: an annotation is selected if its label strictly corresponds to the given pattern;
- contains: an annotation is selected if its label contains the given pattern;
- starts with: an annotation is selected if its label starts with the given pattern;
- ends with: an annotation is selected if its label ends with the given pattern.
All these matches can be reversed to represent respectively: does not exactly match, does not contain, does not start with or does not end with. Moreover, this pattern matching can be case-sensitive or not.
For complex search, a selection based on regular expressions is available for advanced users.
A multiple pattern selection can be expressed in both ways:
- enter multiple patterns at the same time (separated by commas) to mention the system to retrieve either one pattern or the other, etc.
- enter one pattern at a time and choose the appropriate button:
Apply All
orApply any
.
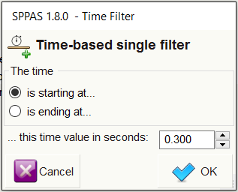
Another important feature for a filtering system is the possibility to retrieve annotated data of a certain duration, and in a certain range of time in the timeline.
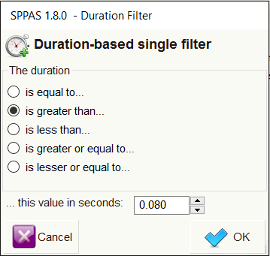
Search can also start and/or ends at specific time values in a tier.
In SPPAS 3.7, a new filter is added: it can select annotation
depending on their number of labels. For example, the automatic
annotation Normalization
creates a tier Tokens
in which
each annotation contains a list of labels - one per token; then it is
possible to get the annotations with more than three tokens, with only
one token, etc.
All the given filters are summarized in the SingleFilter
dialog. To complete the filtering process, it must be clicked on one of
the 'Apply' buttons and the new resulting tiers are added in the
annotation file(s).
In the given example:
- click on
Apply All
to get either 'a' or '@' or 'E' vowels during more than 80ms, after the 5th minute. - click on
Apply Any
to get 'a' or '@' or 'E' vowels, and all annotations during more than 80 ms, and all annotations after the 5th minute.
Read the following publications for details:
Brigitte Bigi (2019). Filtering multi-levels annotated data. In 9th Language & Technology Conference: Human Language Technologies as a Challenge for Computer Science and Linguistics, pp. 13-14, Poznań, Poland.
Brigitte Bigi, Jorane Saubesty (2015). Searching and retrieving multi-levels annotated data, Proceedings of Gesture and Speech in Interaction, Nantes (France).
Annotations: Relation filter
Regarding the searching problem, linguists are typically interested in locating patterns on specific tiers, with the possibility to relate different annotations a tier from another. The proposed system offers a powerful way to request/extract data, with the help of Allen’s interval algebra.
In 1983 James F. Allen published a paper in which he proposed 13 basic relations between time intervals that are distinct, exhaustive, and qualitative:
- distinct because no pair of definite intervals can be related by more than one of the relationships;
- exhaustive because any pair of definite intervals are described by one of the relations;
- qualitative (rather than quantitative) because no numeric time spans are considered.
These relations and the operations on them form Allen’s interval algebra. These relations were extended to Interval-Tiers as Point-Tiers to be used to find/select/filter annotations in any kind of time-aligned tiers.
For the sake of simplicity, only the 13 relations of the Allen’s algebra are available in the GUI. But actually, we implemented the 25 relations proposed Pujari and al. (1999) in the INDU model. This model is fixing constraints on INtervals (with Allen’s relations), and on DUration (durations are equals, one is lesser/greater than the other). Such relations are available while requesting with Python.
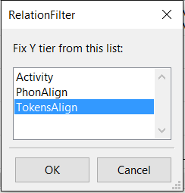
At a first stage, the user must select the tiers to be filtered and
click on RelationFilter
. The second stage is to select the tier
that will be used for time-relations.
The next step consists in checking the Allen’s relations that will be
applied. The last stage is to fix the name of the resulting tier. The
above screenshots illustrates how to select the first phoneme of each
token, except for tokens that are made of only one phoneme (in this
later case, the equal
relation should be checked).
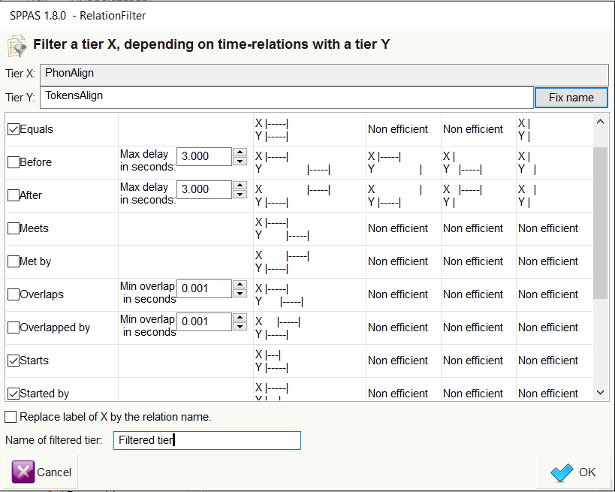
To complete the filtering process, it must be clicked on the
Apply
button and the new resulting tiers are added in the
annotation file(s).