Automatic Annotations
Introduction
Recommended corpus construction workflow
The kind of process to implement in the perspective of obtaining rich and broad-coverage multimodal/multi-levels annotations of a corpus is illustrated in next Figure. It describes the steps of the annotation workflow. This Figure must be read from top to bottom and from left to right, starting by the recordings and ending to the analysis of annotated files. Yellow boxes represent manual annotations, blue boxes represent automatic ones. This Figure is simplified: there are other ways to construct a corpus, but this one is the best solution to get effective automatic annotations with SPPAS.
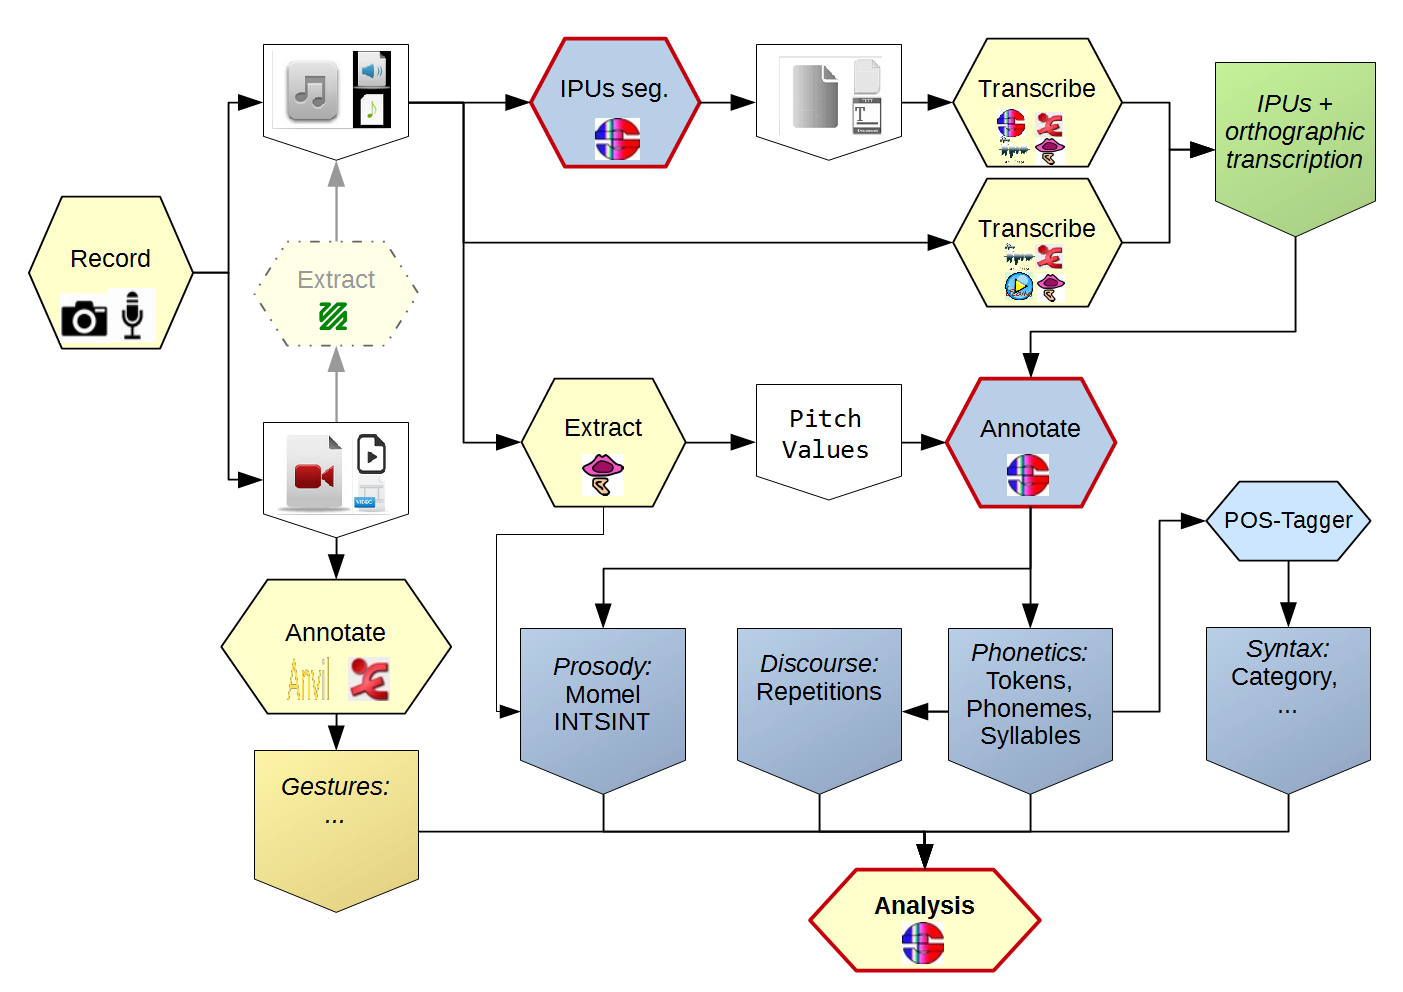
After recording an audio file (see recording recommendations), the first annotation to perform is to search for the IPUs - Inter-Pausal Units. IPUs are sounding segments surrounded by silent pauses of more than X ms, and time-aligned on the speech signal.
An orthographic transcription (OT) has to be performed manually inside these IPUs. Using an Enriched OT is a better idea – see SPPAS transcription convention. Then text normalization automatic annotation normalizes the orthographic transcription of each IPU. The phonetization converts the normalized text into a grammar of pronunciations using the X-SAMPA standard. Alignment performs segmentation at phonemes and tokens levels, etc.
At the end of each automatic annotation process, SPPAS produces a Procedure Outcome Report. It contains important information about the annotations: it includes all parameters and eventually warnings and errors that occurred during the annotation process. This window opens in the scope to be read by users (!) and should be saved with the annotated corpus.
SPPAS annotation workflow
Annotations of SPPAS are categorized as:
- STANDALONE: they require the files of a single speaker,
- SPEAKER: they require the files of a single speaker at two different
moments in time, for example
before sleeping versus after sleeping
,the morning versus the afternoon
,10 years ago versus nowadays
… - INTERACTION: they require the files of two different speakers who are supposed to interact in the same conversation (i.e., the files are of same duration).
All the 23 automatic annotations of type STANDALONE are illustrated in the Figure at top of the page. This Figure can also be downloaded at https://sppas.org/etc/figures/workflow_standalone.pdf. It is also included in the documentation folder of the SPPAS package. It shows the detailed process to perform annotations in a suitable way.
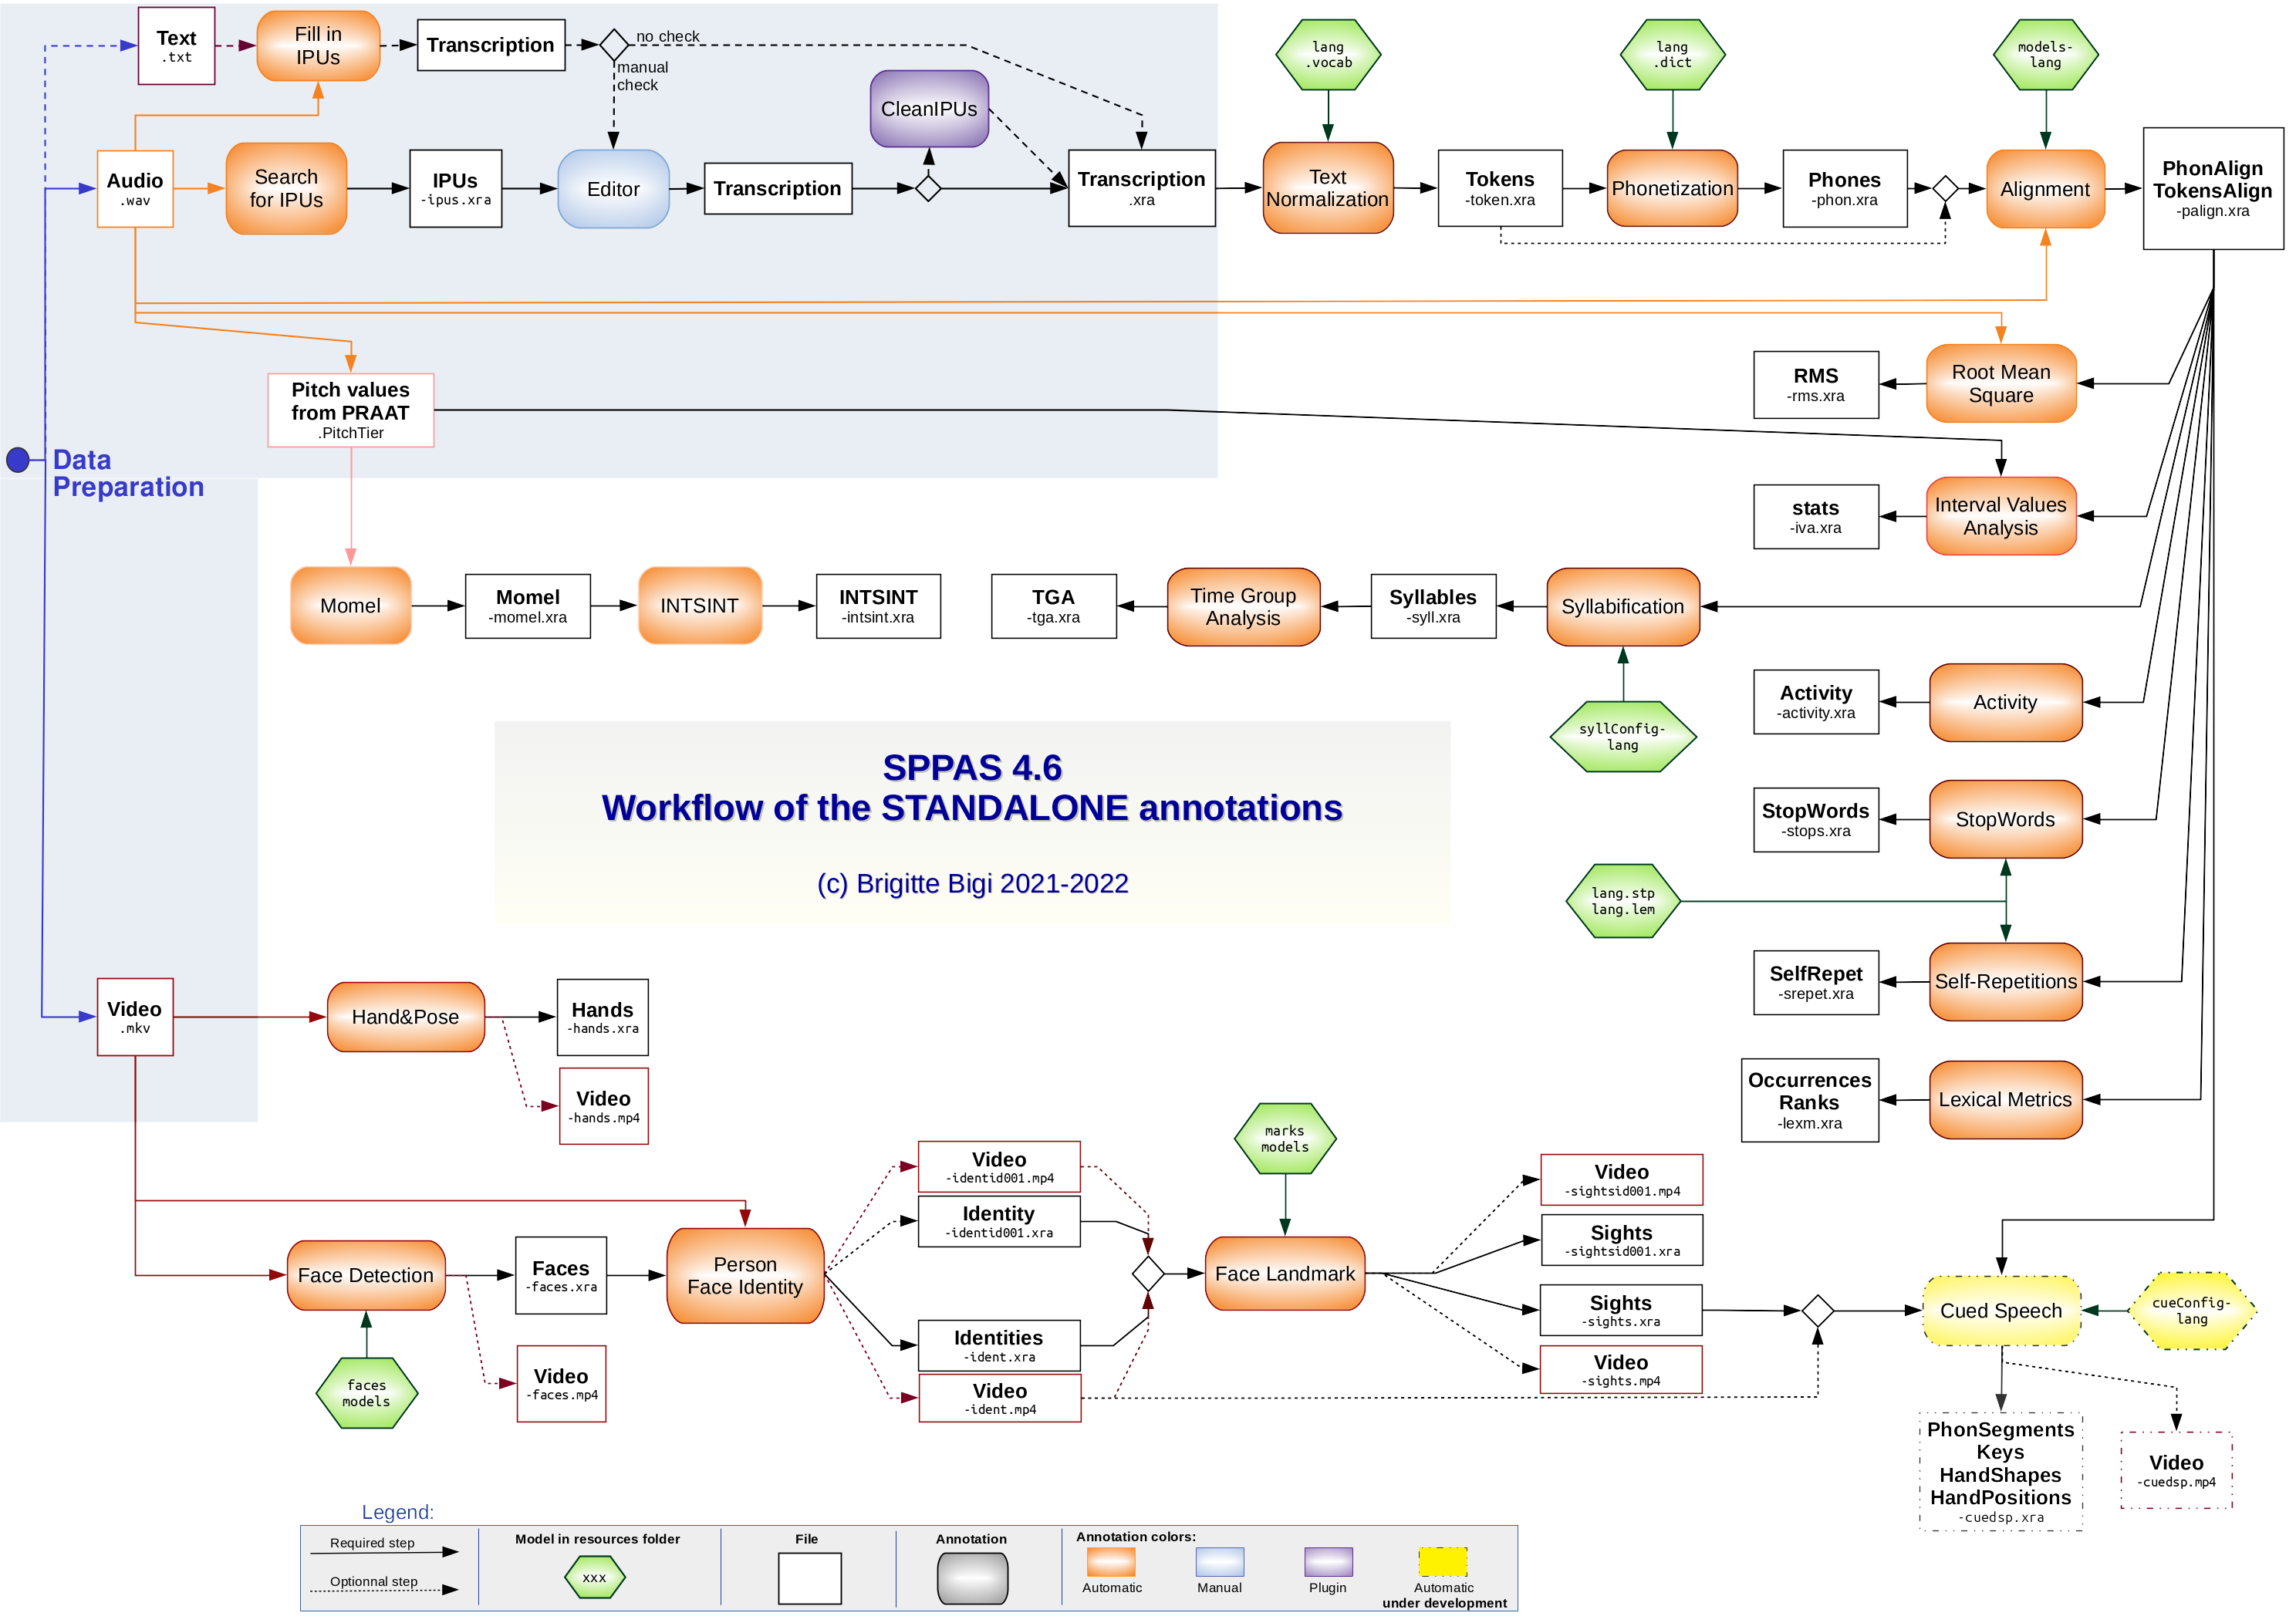
The best way to read this Figure is to search for the annotation
result you want and to follow the arrows that made it possible. They are
representing all the annotations you’ll have to ask SPPAS to perform and
that you can manually check or customize to make it YOUR SPPAS
Solution
. Two examples of SPPAS solutions are available on the
website: https://sppas.org/workdemo.html.
This chapter describes each annotation box.Recordings
SPPAS performs automatic annotations: It does not make sense to hope for miracles, but you can expect good enough results that will allow you to save your precious time! And it begins by taking care of the recordings…
Audio files
Only
wavandauaudio file formats are supported by Python, so does SPPAS;
Only mono audio files are supported by automatic annotations of SPPAS.
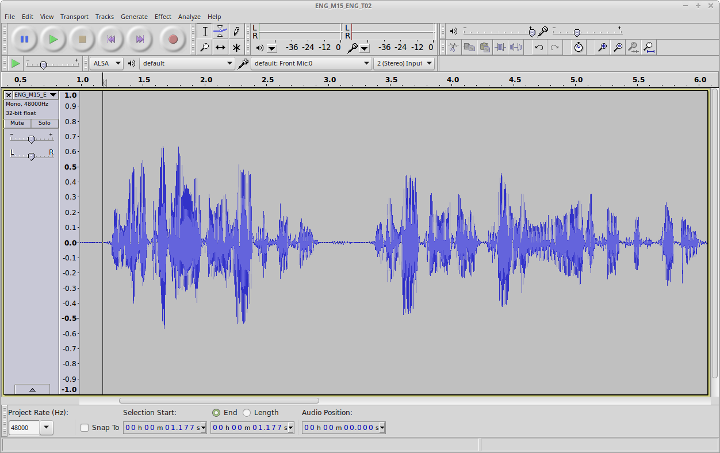
SPPAS verifies if the audio file is 16 bits sample rate and 16000 Hz frame rate; otherwise it automatically creates a new converted audio file. For very long files, this process may take time. If Python can’t read the audio file, an error message is displayed: you’ll have to convert it with audacity, praat… A relatively good recording quality is expected (see next Figure).
For example, both Search for IPUs
and Fill in IPUs
require a better quality compared to what is expected by
Alignment
. For that latter, it depends on the language. The
quality of the automatic annotation results highly depends on the
quality of the audio file.
Providing a guideline or recommendation of good practices is impossible, because it depends on too many factors. However, the followings are obvious:
- Never records a lossy audio file (like for example, with a smartphone). Moreover, extracting the audio file from a video is only possible if the embedded audio is either lossless or not compressed: see this page https://en.wikipedia.org/wiki/Comparison_of_video_container_formats.
- The better microphone, the better audio file! Using a headworn microphone is much better than a clip-on one. At LPL, we get very good results with the AKG C520.
- The recorded volume must be high enough. Ideally, it should be in range [-0.5 ; 0.5]. If all the amplitude values are in range [-0.1 ; 0.1], the difference between speech and silence is very slight, and it makes the search for silences challenging.
- The audio file should not be 32 floating bits. For speech, 32 bits are totally unuseful and - worse, sometimes Python can’t read it.
- as you probably don’t plan to burn your audio file on a CD-ROM, 44100Hz framerate does not make sense. 48,000 Hz is a more reasonable choice, particularly because it doesn't need of elaborated interpolation methods when it's converted to 16,000 Hz for automatic annotations.
Video files
SPPAS is proposing a few automatic annotations of a video if the
Python library opencv
is installed. All of them are annotating
the face of recorded people.
File formats and tier names
When annotating with the GUI, the filename of each annotation is
fixed and can’t be customized. A filename is made of a root, followed by
a pattern then an extension. For example oriana1-palign.TextGrid
is made of the root oriana1
, the pattern -palign
and the
extension .TextGrid
. Each annotation allows fixing manually the
pattern and choosing the extension among the list of the supported
ones. Notice that the pattern must start with the -
(minus)
character. It means that the character -
must only be used to
separate the root to the pattern:
The character
-can’t be used in the root of a filename.
The names of the tiers the annotations are expecting for their input are fixed, and they can't be changed; so do the created tier names.
File extensions are case-sensitive, use TextGrid (Praat) instead of textgrid.
Resources required to annotate
The resources that are required to perform annotations are of two different types:
- models, like a face model that is required to perform face detection,
- language resources, like a pronunciation dictionary. English and French resources are distributed in the SPPAS package. Resources for other languages can be installed at any time with the setup, see installation instructions.
All the automatic annotations proposed by SPPAS are designed with language-independent algorithms, but some annotations are requiring language-knowledges. This linguistic knowledge is represented in external files, so they can be added, edited or removed easily.
Adding a new language for a given annotation only consists in adding the linguistic resources the annotation needs, like lexicons, dictionaries, models, set of rules, etc. For exemple, see:
Mélanie Lancien, Marie-Hélène Côté, Brigitte Bigi (2020). Developing Resources for Automated Speech Processing of Québec French. In Proceedings of The 12th Language Resources and Evaluation Conference, pp. 5323–5328, Marseille, France.
Brigitte Bigi, Bernard Caron, Abiola S. Oyelere (2017). Developing Resources for Automated Speech Processing of the African Language Naija (Nigerian Pidgin). In 8th Language and Technology Conference: Human Language Technologies as a Challenge for Computer Science and Linguistics, pp. 441-445, Poznań, Poland.
Download and install linguistic resources
Since June 2020, the linguistic resources and models for some annotations are no longer distributed into the package of SPPAS. Instead, they are hosted by Ortolang repository with public access.
They can be installed automatically into SPPAS by the
preinstall.py program (CLI) or in the GUI by clicking
Add languages
or Add annotations
in the toolbar of the
Annotate
page.
They can also be installed manually by downloading them at: https://hdl.handle.net/11403/sppasresources and
unpacking the zip file into the resources folder of SPPAS
package.
A full description of such resources and how to install them is available in the repository: download and read the file Documentation.pdf. It contains details about the list of phonemes, authors, licenses, etc.
New language support
Some of the annotations are requiring external linguistic resources in order to work efficiently on a given language: text normalization requires a lexicon, phonetization requires a pronunciation dictionary, etc. It is either possible to install and use the existing resources or to create and use custom ones.
When executing SPPAS, the list of available languages for each
annotation is dynamically created by exploring the
resources directory content. This means that:
- the resources you added or modified are automatically taken into account (i.e., there’s no need to modify the program itself);
- SPPAS needs to be re-started if new resources are added when it was already being running.
Annotate with the GUI
Performing automatic annotations with SPPAS Graphical User Interface is a step-by-step process.
It starts by checking the list of paths and/or roots and/or files in
the currently active workspace of the Files
page. Then, in the
Annotate
page:
- Select the output file format, i.e., the file format of the files SPPAS will create;
- Select a language in the list;
- Enable each annotation to perform by clicking on the button in
red, among STANDALONE, SPEAKER and INTERACTION annotation types. Each
button will be turned green if some annotations are selected.
- 3.1 Configure each annotation by clicking on the
Configure…
link text in blue; - 3.2 The language of any annotation can be changed.
- 3.1 Configure each annotation by clicking on the
- Click on the Perform annotations button, and wait. A progress bar should indicate the annotation steps and files. Some annotations are very very fast, but some others are not. For example, Face Detection is 2.5 x real times, i.e., annotating a video of 1 minute will take 2 minutes 30 secs.
- It is important to read the Procedure Outcome report. It allows
checking that everything happened normally during the automatic
annotations. This report is saved in the
logs
folder of the SPPAS package.
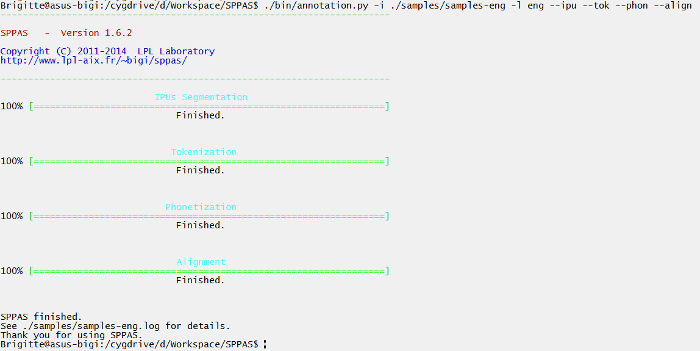
Annotate with the CLI
To perform automatic annotations with the Command-line User
Interface, there is a main program annotation.py. This
program allows annotating in an easy-and-fast way, but none of the
annotations can be configured: their default parameters are used. This
program performs automatic annotations on a given file or on all files
of a directory. It strictly corresponds to the button
Perform annotations of the GUI except that annotations are
pre-configured: no specific option can be specified.
usage: python .\sppas\bin\annotation.py -I file|folder [options]optional arguments:
-h, --help show this help message and exit
--log file File name for a Procedure Outcome Report (default: None)
--momel Activate Momel
--intsint Activate INTSINT
--fillipus Activate Fill in IPUs
--searchipus Activate Search for IPUs
--textnorm Activate Text Normalization
--phonetize Activate Phonetization
--alignment Activate Alignment
--syllabify Activate Syllabification
--tga Activate Time Group Analysis
--activity Activate Activity
--rms Activate RMS
--selfrepet Activate Self-Repetitions
--stopwords Activate Stop Tags
--lexmetric Activate LexMetric
--otherrepet Activate Other-Repetitions
--reoccurrences Activate Re-Occurrences
--merge Create a merged file with all the annotations
Files:
-I file|folder Input transcription file name (append).
-l lang Language code (iso8859-3). One of: por eng ita kor deu nan
vie und hun spa cat pol yue fra pcm yue_chars cmn jpn.
-e .ext Output file extension. One of: .xra .TextGrid .eaf .csv
.mrk .txt .stm .ctm .lab .mlf .sub .srt .antx .arff .xrffExamples of use:
./sppas/bin/annotation.py -I .\samples\samples-eng
                                -l eng
                                -e .TextGrid
                                --fillipus --textnorm --phonetize --alignment
A progress bar is displayed for each annotation if the Terminal is
supporting it (bash for example). Instead, the progress is
indicated line-by-line (Windows PowerShell for example).
Each annotation has also its own program and all options can be
fixed. They are all located in the sppas/bin folder.
The procedure outcome report
It is crucial to conscientiously read this report: it describes exactly what happened during the automatic annotation process. It is recommended to store a copy of the report within the corpus because it contains information which is interesting to know for anyone using the annotations.
By default, all reports are saved in the logs
folder of the
SPPAS package.
The text first indicates the version of SPPAS that was used. This information is very important. Annotations in SPPAS and their related resources are regularly improved and then, the result of the automatic process can change from one version to the other one.
Example:
SPPAS version 3.5
      Copyright (C) 2011-2021 Brigitte Bigi
      Web site: https://sppas.org/
      Contact: Brigitte Bigi (contact@sppas.org)
Secondly, the text shows information related to the given input:
- the selected language of each annotation, only if the annotation is
language-dependent. For some language-dependent annotations, SPPAS can
still perform the annotation even if the resources for a given language
are not available: in that case, select
und
, which is the iso639-3 code forundetermined
. - the selected files and folder to be annotated.
- the list of annotations, and if each annotation was enabled. In that case, enabled means that the checkbox of the annotation was checked by the user and that the resources are available for the given language. On the contrary, disabled means that either the checkbox was not checked or the required resources are not available.
- the file format of the resulting files.
Example:
Date: 2020-04-21T11:14:01+02:00
      Input languages:
        - Momel: ---
        - INTSINT: ---
        - Fill in IPUs: ---
        - Search for IPUs: ---
        - Text Normalization: eng
        - Phonetization: eng
        - Alignment: eng
        - Syllabification:
        - Time Group Analysis: ---
        - Activity: ---
        - RMS: ---
        - Self-Repetitions:
        - Stop Tags:
        - LexMetric: ---
        - Other-Repetitions:
        - Re-Occurrences: ---
      Selected files and folders:
        - oriana1.wav
      Selected annotations:
        - Momel: enabled
        - INTSINT: enabled
        - Fill in IPUs: enabled
        - Search for IPUs: disabled
        - Text Normalization: enabled
        - Phonetization: enabled
        - Alignment: enabled
        - Syllabification: disabled
        - Time Group Analysis: disabled
        - Activity: disabled
        - RMS: disabled
        - Self-Repetitions: disabled
        - Stop Tags: disabled
        - LexMetric: disabled
        - Other-Repetitions: disabled
        - Re-Occurrences: disabled
      File extension: .xra
Thirdly, each automatic annotation is described in details, for each annotated file. At the first stage, the list of options and their value is summarized. Example:
                        Text Normalization
      The vocabulary contains 121250 tokens.
      The replacement dictionary contains 8 items.
      Options:
       ... inputpattern:
       ... outputpattern: -token
       ... faked: True
       ... std: False
       ... custom: False
       ... occ_dur: True
Then, a diagnosis of the given file is printed. It can be: 1.
Valid
: the file is relevant 2. Admit
: the file is not like
expected, but SPPAS will convert it and work on the converted file. 3.
Invalid
: SPPAS can’t work with that file. The annotation is then
disabled. In case 2 and 3, a message indicates the origin of the
problem.
Then, if any, the annotation procedure prints messages. Four levels of information must draw your attention:
[ OK ]
means that everything happened normally. The annotation was performed successfully.[ IGNORE ]
means that SPPAS ignored the file and didn’t do anything.[ WARNING ]
means that something happened abnormally, but SPPAS found a solution, and the annotation was performed anyway.[ ERROR ]
means that something happened abnormally and SPPAS failed to found a solution. The annotation was either not performed, or performed with a wrong result.
Example of Warning
message:
 ...  ... Export AP_track_0711.TextGrid
       ...  ... into AP_track_0711.xra
       ...  ... [ IGNORE  ] because a previous segmentation is existing.
Example of Warning
message:
 ...  ... [ WARNING  ] chort- is missing of the dictionary and was
                             automatically phonetized as S-O/-R-t
At the end of the report, the Result statistics
section
mentions the number of files that were annotated for each annotation, or
-1 if the annotation was disabled.
Orthographic Transcription
An orthographic transcription is often the minimum requirement for a speech corpus, so it is at the top of the annotation procedure, and it is the entry point for most of the automatic annotations. A transcription convention is designed to provide rules for writing speech corpora. This convention establishes what are the phenomena to transcribe and also how to mention them in the orthography.
From the beginning of its development it was considered to be
essential for SPPAS to deal with an Enriched Orthographic
Transcription (EOT). The transcription convention is summarized
below and all details are given in the file TOE-SPPAS.pdf,
available in the documentation folder. It indicates the
rules and includes examples of what is expected or recommended.
Convention overview:
- truncated words, noted as a
-
at the end of the token string (an ex- example); - noises, noted by a
*
(not available for some languages); - laughter, noted by a
@
(not available for some languages); - short pauses, noted by a
+
; - elisions, mentioned in parentheses;
- specific pronunciations, noted with brackets [example,eczap];
- comments are preferably noted inside braces {this is a comment!};
- comments can be noted inside brackets without using comma [this and this];
- liaisons, noted between
=
(this =n= example); - morphological variants with <ice scream,I scream>,
- proper name annotation, like $ John S. Doe $.
The symbols * + @ must be surrounded by whitespace.
SPPAS allows including the regular punctuations. For some languages, it also allows to include numbers: they will be automatically converted to their written form during the Text Normalization process.
From this EOT, several derived transcriptions can be generated automatically, including the two followings:
- the standard transcription is the list of orthographic tokens (optional);
- a specific transcription from which the phonetic tokens are obtained to be used by the grapheme-phoneme converter that is named faked transcription (the default).
For example, with the transcribed sentence: This [is,iz] + hum… an enrich(ed) transcription {loud} number 1!, the derived transcriptions are:
- standard: this is + hum an enriched transcription number one
- tokens: this iz + hum an enrich transcription number one
Notice that the convention allows to include a large scale of phenomena, for which most of them are optional. As a minimum, the transcription must include:
- filled pauses;
- short pauses;
- repeats;
- noises and laugh items (not available for Japanese and Cantonese).
Finally, it has to be noticed that this convention is not
software-dependent. The orthographic transcription can be manually
performed within SPPAS GUI in the Edit
page, with Praat, with
Annotation Pro, Audacity, …
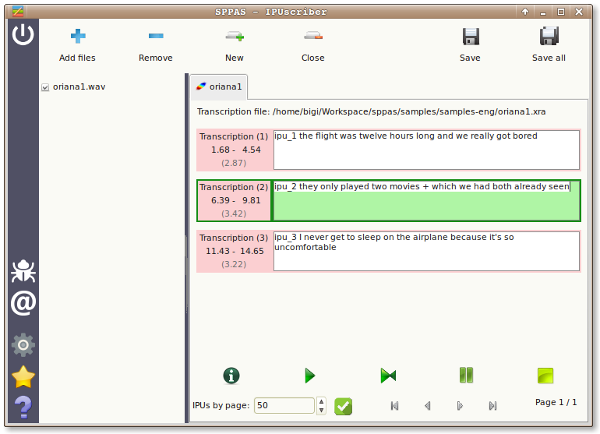
Search for Inter-Pausal Units (IPUs)
Overview
The Search for IPUs is a semi-automatic annotation process. This
segmentation provides an annotated file with one tier named IPUs
.
The silence intervals are labeled with the #
symbol, and IPUs
intervals are labeled with ipu_
followed by the IPU number. This
annotation is semi-automatic: it should be verified
manually.
Notice that the better recording quality, the better IPUs segmentation.
The parameters
The following parameters must be properly fixed:
- Minimum volume value (in seconds): If this value is set to zero, the minimum volume is automatically adjusted for each sound file. Try with it first, then if the automatic value is not correct, set it manually. The Procedure Outcome Report indicates the value the system choose. The AudioRoamer component can also be of great help: it indicates min, max and mean volume values of the sound.
- Minimum silence duration (in seconds): By default, this is fixed to 0.2 sec. This duration mostly depends on the language. It is commonly fixed to at least 0.2 sec for French and at least 0.25 seconds for English language.
- Minimum speech duration (in seconds): By default, this value is fixed to 0.3 sec. A relevant value depends on the speech style: for isolated sentences, probably 0.5 sec should be better, but it should be about 0.1 sec for spontaneous speech.
- IPUs boundary shift (in seconds) for start or end: a duration which is systematically added to IPUs boundaries, to enlarge the IPUs interval, and as a consequence, the neighboring silences are reduced.
The procedure outcome report indicates the values (volume, minimum durations) that were used by the system for each sound file.
Perform Search for
IPUs
with the GUI
It is an annotation of STANDALONE type.
Click on the Search IPUs
activation button and on the
Configure…
blue text to fix options.

Notice that the speech segments can be transcribed using SPPAS, in
the Analyze
page.
Perform Search for
IPUs
with the CLI
searchipus.py is the program to perform this
semi-automatic annotation, i.e. silence/IPUs segmentation, either on a
single file (-i and optionally -o) or on a set of files (by using -I
and optionally -e).
Usage
searchipus.py [files] [options]
      Search for IPUs: Search for Inter-Pausal Units in an audio file.
      optional arguments:
        -h, --help            show this help message and exit
        --quiet               Disable the verbosity
        --log file            File name for a Procedure Outcome Report (default: None)
      Files (manual mode):
        -i file               Input wav file name.
        -o file               Annotated file with silences/units segmentation
                              (default: None)
      Files (auto mode):
        -I file               Input wav file name (append).
        -e .ext               Output file extension. One of: .xra .TextGrid .eaf
                              .csv .mrk .txt .stm .ctm .lab .mlf .sub .srt .antx
                              .arff .xrff
      Options:
        --outputpattern OUTPUTPATTERN
                              Output file pattern (default: )
        --win_length WIN_LENGTH
                              Window size to estimate rms (in seconds) (default:
                              0.020)
        --threshold THRESHOLD
                              Threshold of the volume value (rms) for the detection
                              of silences, 0=automatic (default: 0)
        --min_ipu MIN_IPU     Minimum duration of an IPU (in seconds) (default:
                              0.300)
        --min_sil MIN_SIL     Minimum duration of a silence (in seconds) (default:
                              0.200)
        --shift_start SHIFT_START
                              Systematically move at left the boundary of the
                              beginning of an IPU (in seconds) (default: 0.01)
        --shift_end SHIFT_END
                              Systematically move at right the boundary of the end
                              of an IPU (in seconds) (default: 0.02)
      This program is part of SPPAS version 2.4. Copyright (C) 2011-2019 Brigitte
      Bigi. Contact the author at: contact@sppas.org
Examples of use
A single input file and output on stdout:
python .\sppas\bin\searchipus.py -i .\samples\samples-eng\oriana1.wav
          2018-12-19 10:49:32,782 [INFO] Logging set up level=15
          2018-12-19 10:49:32,790 [INFO]  ... Information:
          2018-12-19 10:49:32,792 [INFO]  ... ... Number of IPUs found:       3
          2018-12-19 10:49:32,792 [INFO]  ... ... Threshold volume value:     0
          2018-12-19 10:49:32,792 [INFO]  ... ... Threshold silence duration: 0.200
          2018-12-19 10:49:32,792 [INFO]  ... ... Threshold speech duration:  0.300
          0.000000 1.675000 #
          1.675000 4.580000 ipu_1
          4.580000 6.390000 #
          6.390000 9.880000 ipu_2
          9.880000 11.430000 #
          11.430000 14.740000 ipu_3
          14.740000 17.792000 #
Idem without logs:
python .\sppas\bin\searchipus.py -i .\samples\samples-eng\oriana1.wav --quiet
          0.000000 1.675000 #
          1.675000 4.580000 ipu_1
          4.580000 6.390000 #
          6.390000 9.880000 ipu_2
          9.880000 11.430000 #
          11.430000 14.740000 ipu_3
          14.740000 17.792000 #
Several input files, output in Praat-TextGrid file format:
python .\sppas\bin\searchipus.py -I .\samples\samples-eng\oriana1.wav \
-I .\samples\samples-eng\oriana3.wave -e .TextGrid
2018-12-19 10:48:16,520 [INFO] Logging set up level=15
2018-12-19 10:48:16,522 [INFO] File oriana1.wav: Valid.
2018-12-19 10:48:16,532 [INFO] ... Information:
2018-12-19 10:48:16,532 [INFO] ... ... Number of IPUs found: 3
2018-12-19 10:48:16,532 [INFO] ... ... Threshold volume value: 0
2018-12-19 10:48:16,532 [INFO] ... ... Threshold silence duration: 0.200
2018-12-19 10:48:16,533 [INFO] ... ... Threshold speech duration: 0.300
2018-12-19 10:48:16,538 [INFO] ... E:\bigi\Projets\sppas\samples\samples-eng\oriana1.TextGrid
2018-12-19 10:48:16,538 [INFO] File oriana3.wave: Invalid.
2018-12-19 10:48:16,539 [ERROR] ... ... An audio file with only one channel is expected. Got 2
channels.
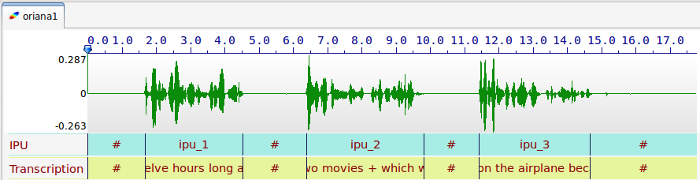
2018-12-19 10:48:16,540 [INFO] ... No file was created.Fill in Inter-Pausal Units (IPUs)
Overview
This automatic annotation consists in aligning macro-units of a
document with the corresponding sound. This segmentation provides an
annotated file with one tier named Transcription
.
IPUs are blocks of speech bounded by silent pauses of more than X ms.
This annotation searches for a silences/IPUs segmentation of a recorded
file (see the previous section) and fill in the IPUs with the transcription
given in a txt file.
How does it work
SPPAS identifies silent pauses in the signal and attempts to align them with the units proposed in the transcription file, under the assumption that each such unit is separated by a silent pause. It is based on the search of silences described in the previous section, but in this case, the number of units to find is known. The system adjusts automatically the volume threshold and the minimum durations of silences/IPUs to get the right number of units. The content of the units has no regard, because SPPAS does not interpret them: it can be the orthographic transcription, a translation, numbers, … This algorithm is language-independent: it can work on any language.
In the transcription file, silent pauses must be indicated using both solutions, which can be combined:
- with the symbol
#
; - with newlines.
A recorded speech file must strictly correspond to a txt
file of the transcription. The annotation provides an annotated file
with one tier named Transcription
. The silence intervals are
labelled with the #
symbol, as IPUs are labelled with ipu_
followed by the IPU number then the corresponding transcription.
The same parameters as those indicated in the previous section must be fixed.
Remark: This annotation was tested on read speech no longer than a few sentences (about 1 minute speech) and on recordings of very good quality.
Perform Fill in IPUs
with the GUI
It is an annotation of STANDALONE type.
Click on the Fill in IPUs
activation button and on the
Configure…
blue text to fix options.
Perform Fill in IPUs
with the CLI
fillipus.py is the program to perform this IPUs
segmentation, i.e. silence/ipus segmentation, either on a single file
(-i and optionally -o) or on a set of files (by using -I and optionally
-e).
Usage
fillipus.py [files] [options]
      Fill in IPUs: Search for Inter-Pausal Units and fill in with a transcription.
      Requires an audio file and a .txt file with the transcription.
      optional arguments:
        -h, --help         show this help message and exit
        --quiet            Disable the verbosity
        --log file         File name for a Procedure Outcome Report (default: None)
      Files (manual mode):
        -i file            Input wav file name.
        -t file            Input transcription file name.
        -o file            Annotated file with filled IPUs
      Files (auto mode):
        -I file            Input wav file name (append).
        -e .ext            Output file extension. One of: .xra .TextGrid .eaf .csv
                           .mrk .txt .stm .ctm .lab .mlf .sub .srt .antx .arff .xrff
      Options:
        --outputpattern OUTPUTPATTERN
                              Output file pattern (default: )
        --min_ipu MIN_IPU  Initial minimum duration of an IPU (in seconds) (default:
                           0.300)
        --min_sil MIN_SIL  Initial minimum duration of a silence (in seconds)
                           (default: 0.200)
      This program is part of SPPAS version 3.0. Copyright (C) 2011-2020 Brigitte
      Bigi. Contact the author at: contact@sppas.org
Examples of use
A single input file with an input in manual mode:
python .\sppas\bin\fillipus.py -i .\samples\samples-eng\oriana1.wav -t
     .\samples\samples-eng\oriana1.txt
          2018-12-19 11:03:15,614 [INFO] Logging set up level=15
          2018-12-19 11:03:15,628 [INFO]  ... Information:
          2018-12-19 11:03:15,628 [INFO]  ... ... Threshold volume value:     122
          2018-12-19 11:03:15,630 [INFO]  ... ... Threshold silence duration: 0.200
          2018-12-19 11:03:15,630 [INFO]  ... ... Threshold speech duration:  0.300
          0.000000 1.675000 #
          1.675000 4.570000 the flight was 12 hours long and we really got bored
          4.570000 6.390000 #
          6.390000 9.870000 they only played two movies + which we had both already seen
          9.870000 11.430000 #
          11.430000 14.730000 I never get to sleep on the airplane because it's so uncomfortable
          14.730000 17.792000 #
A single input file in automatic mode:
python .\sppas\bin\fillipus.py -I .\samples\samples-eng\oriana1
      python .\sppas\bin\fillipus.py -I .\samples\samples-eng\oriana1.wav
      python .\sppas\bin\fillipus.py -I .\samples\samples-eng\oriana1.txt
Text normalization
Overview
In principle, any system that deals with unrestricted text need the
text to be normalized. Texts contain a variety of non-standard
token types such as digit sequences, words, acronyms and letter
sequences in all capitals, mixed case words, abbreviations, roman
numerals, URL’s and e-mail addresses… Normalizing or rewriting such
texts using ordinary words is then an important issue. The main steps of
the text normalization implemented in SPPAS (Bigi 2011) are:
- Replace symbols by their written form, thanks to a
replacement
dictionary, located into the folderrepl
in theresources
directory. - Word segmentation based on the content of a lexicon.
- Convert numbers to their written form.
- Remove punctuation.
- Lower the text.
Adapt Text normalization
Word segmentation of SPPAS is mainly based on the use of a lexicon.
If a segmentation is not as expected, it is up to the user to modify the
lexicon: Lexicons of all supported languages are all located in the
folder vocab
of the resources
directory. They are in the
form of one word at a line
with UTF-8 encoding and LF
for
newline.
Support of a new language
Adding a new language in Text Normalization consists in the following steps:
- Create a lexicon. Fix properly its encoding (utf-8), its newlines
(LF), and fix the name and extension of the file as follows:
- language name with iso639-3 standard
- extension
.vocab
- Put this lexicon in the
resources/vocabfolder - Create a replacement dictionary for that language (take a look on the ones of the other language!)
- Optionally, the language can be added into the num2letter.py program
That’s it for most of the languages! If the language requires more steps, simply write to the author to collaborate, find some funding, etc. like it was already done for Cantonese (Bigi & Fung 2015) for example.
Perform Text Normalization with the GUI
It is an annotation of STANDALONE type.
The SPPAS Text normalization system takes as input a file (or a list
of files) for which the name strictly matches the name of the audio file
except the extension. For example, if a file with name
oriana1.wav
is given, SPPAS will search for a file with name
oriana1.xra
at a first stage if .xra
is set as the default
extension, then it will search for other supported extensions until a
file is found.
This file must include a tier with an orthographic transcription. At
a first stage, SPPAS tries to find a tier with
transcription as name. If such a tier does not exist, the
first tier that is matching one of the following strings is used
(case-insensitive search):
transtrstoeortho
Text normalization produces a file with -token
appended to its
name, i.e., oriana1-token.xra
for the previous example. By
default, this file is including only one tier with the resulting
normalization and with name Tokens
. To get other versions of the
normalized transcription, click on the Configure
text then check
the expected tiers.
Read the Introduction
of this chapter for a better
understanding of the difference between standard
and faked
results.
To perform the text normalization process, click on the Text
Normalization activation button, select the language and click on the
Configure…
blue text to fix options.
Perform Text Normalization with the CLI
normalize.py is the program to perform Text
Normalization, i.e., the text normalization of a given file or a raw
text.
Usage
normalize.py [files] [options]
      Text Normalization: Text normalization segments the orthographic transcription
      into tokens and remove punctuation, convert numbers, etc. Requires an
      orthographic transcription into IPUs.
      optional arguments:
        -h, --help       show this help message and exit
        --quiet          Disable the verbosity
        --log file       File name for a Procedure Outcome Report (default: None)
      Files (manual mode):
        -i file          Input transcription file name.
        -o file          Annotated file with normalized tokens.
      Files (auto mode):
        -I file          Input transcription file name (append).
        -l lang          Language code (iso8859-3). One of: cat cmn deu eng fra hun
                         ita jpn kor nan pcm pol por spa vie yue yue_chars.
        -e .ext          Output file extension. One of: .xra .TextGrid .eaf .csv
                         .mrk .txt .stm .ctm .lab .mlf .sub .srt .antx .arff .xrff
      Resources:
        -r vocab         Vocabulary file name
      Options:
        --inputpattern INPUTPATTERN
                              Input file pattern (orthographic transcription)
                              (default: )
        --outputpattern OUTPUTPATTERN
                              Output file pattern (default: -token)
        --faked FAKED    Create a tier with the faked tokens (required for
                         phonetization) (default: True)
        --std STD        Create a tier with the standard tokens (useful if EOT)
                         (default: False)
        --custom CUSTOM  Create a customized tier (default: False)
        --occ_dur OCC_DUR     Create tiers with number of tokens and duration of
                              each IPU (default: True)
      This program is part of SPPAS version 2.4. Copyright (C) 2011-2019 Brigitte
      Bigi. Contact the author at: contact@sppas.org
Examples of use
A single input file with a raw transcription input in manual mode:
python .\sppas\bin\normalize.py -r .\resources\vocab\eng.vocab -i .\samples\samples-
     eng\oriana1.txt
          2018-12-19 11:48:34,151 [INFO] Logging set up level=15
          2018-12-19 11:48:34,473 [INFO]  ... ... Intervalle numéro 1.
          2018-12-19 11:48:34,477 [INFO]  ... ... Intervalle numéro 2.
          2018-12-19 11:48:34,480 [INFO]  ... ... Intervalle numéro 3.
          Tokens
          1, the flight was twelve hours long and we really got bored
          2, they only played two movies + which we had both already seen
          3, i never get to sleep on the airplane because it's so uncomfortable
A single input file with a transcription time-aligned into the IPUS, in manual mode and no logs:
python .\sppas\bin\normalize.py -r .\resources\vocab\eng.vocab
      -i .\samples\samples-eng\oriana1.xra --quiet
          Tokens
          0.000000, 1.675000 #
          1.675000, 4.570000 the flight was twelve hours long and we really got bored
          4.570000, 6.390000 #
          6.390000, 9.870000 they only played two movies + which we had both already seen
          9.870000, 11.430000 #
          11.430000, 14.730000 i never get to sleep on the airplane because it's so uncomfortable
          14.730000, 17.792000 #
The same file in automatic mode can be annotated with one of the following commands:
python .\sppas\bin\normalize.py -I .\samples\samples-eng\oriana1.xra -l eng
      python .\sppas\bin\normalize.py -I .\samples\samples-eng\oriana1.txt -l eng
      python .\sppas\bin\normalize.py -I .\samples\samples-eng\oriana1.wav -l eng
      python .\sppas\bin\normalize.py -I .\samples\samples-eng\oriana1 -l eng
This program can also normalize data from the standard input. Example of use, using stdin/stdout under Windows:
Write-Output "The flight was 12 HOURS {toto} long." |
      python .\sppas\bin\normalize.py -r .\resources\vocab\eng.vocab --quiet
          the
          flight
          was
          twelve
          hours
          long
In that case, the comment mentioned with the braces is removed and the number is converted to its written form. The character “_” is used for compound words (it replaces the whitespace).
Phonetization
Overview
Phonetization, also called grapheme-phoneme conversion, is the process of representing sounds with phonetic signs. However, converting from written texts into actual sounds, for any language, cause several problems that have their origins in the relative lack of correspondence between the spelling of the lexical items and their sound contents. As a consequence, SPPAS implements a dictionary-based solution which consists in storing a maximum of phonological knowledge in a lexicon. This approach is then language-independent. SPPAS phonetization process is the equivalent of a sequence of dictionary look-ups.
Most of the other systems assume that all words of the speech transcription are mentioned in the pronunciation dictionary. On the contrary, SPPAS includes a language-independent algorithm which is able to phonetize unknown words of any language as long as a (minimum) dictionary is available (Bigi 2013). The Procedure Outcome Report reports on such cases with a WARNING message.
Adapt Phonetization
Since Phonetization is only based on the use of a pronunciation
dictionary, the quality of the result only depends on this resource. If
a pronunciation is not as expected, it is up to the user to change it in
the dictionary: Dictionaries are located in the folder dict
of
the resources
directory. They are all with UTF-8 encoding and LF
for newline.
The format of the dictionaries is HTK-like. As example, below is a piece
of the eng.dict file:
    THE             [THE]           D @
          THE(2)          [THE]           D V
          THE(3)          [THE]           D i:
          THEA            [THEA]          T i: @
          THEALL          [THEALL]        T i: l
          THEANO          [THEANO]        T i: n @U
          THEATER         [THEATER]       T i: @ 4 3:r
          THEATER'S       [THEATER'S]     T i: @ 4 3:r z
The first column indicates the word, followed by the variant number (except for the first one). The second column indicates the word between brackets. The last columns are the succession of phones, separated by a whitespace. SPPAS is relatively compliant with the format and accept empty brackets or missing brackets.
The phoneset of the languages are mainly based on X-SAMPA international
standard. See the chapter Resources
of this documentation to know
the list of accepted phones for a given language. This list can’t be
extended nor modified by users. However, new phones can be added: Send
an e-mail to the author to collaborate in that way.
Actually, some words can correspond to several entries in the dictionary with various pronunciations. These pronunciation variants are stored in the phonetization result. By convention, whitespace separate words, minus characters separate phones and pipe character separate phonetic variants of a word. For example, the transcription utterance:
- Transcription:
The flight was 12 hours long. - Text Normalization:
the flight was twelve hours long - Phonetization:
D-@|D-V|D-i: f-l-aI-t w-A-z|w-V-z|w-@-z|w-O:-z t-w-E-l-v aU-3:r-z|aU-r-z l-O:-N
Support of a new language
The support of a new language in Phonetization only consists in: 1.
creating the pronunciation dictionary. The following constraints on the
file must be respected: - its format (HTK-like), - its encoding (UTF-8),
- its newlines (LF), - its phone set (X-SAMPA), - its file name
(iso639-3 of the language and .dict
extension). 2. adding the
dictionary in the dict
folder of the resources
directory.
Perform Phonetization with the GUI
It is an annotation of STANDALONE type.
The Phonetization process takes as input a file that strictly match
the audio file name except for the extension and that -token
is
appended. For example, if the audio file name is oriana1.wav
, the
expected input file name is oriana1-token.xra
if .xra is the
default extension for annotations. This file must include a
normalized orthographic transcription. The name of such
tier must contain one of the following strings:
tok
trans
The first tier that matches one of these requirements is used (this match is case-insensitive).
Phonetization produces a file with -phon
appended to its name,
i.e. oriana1-phon.xra
for the previous example. This file
contains only one tier with the resulting phonetization and with name
Phones
.
To perform the annotation, click on the Phonetization activation
button, select the language and click on the Configure…
blue text
to fix options.
Perform Phonetization with the CLI
phonetize.py is the program to perform Phonetization on
a given file, i.e., the grapheme-conversion of a file or a raw text.
Usage
phonetize.py [files] [options]
      Phonetization: Grapheme to phoneme conversion represents sounds with phonetic
      signs. Requires a Text Normalization.
      optional arguments:
        -h, --help            show this help message and exit
        --quiet               Disable the verbosity
        --log file            File name for a Procedure Outcome Report (default: None)
      Files (manual mode):
        -i file               Input tokenization file name.
        -o file               Annotated file with phonetization.
      Files (auto mode):
        -I file               Input transcription file name (append).
        -l lang               Language code (iso8859-3). One of: cat cmn deu eng fra
                              ita jpn kor nan pcm pol por spa yue yue_chars.
        -e .ext               Output file extension. One of: .xra .TextGrid .eaf
                              .csv .mrk .txt .stm .ctm .lab .mlf .sub .srt .antx
                              .arff .xrff
      Resources:
        -r dict               Pronunciation dictionary (HTK-ASCII format).
        -m map_file           Pronunciation mapping table. It is used to generate
                              new pronunciations by mapping phonemes of the
                              dictionary.
      Options:
        --inputpattern INPUTPATTERN
                              Input file pattern (tokenization) (default: -token)
        --outputpattern OUTPUTPATTERN
                              Output file pattern (default: -phon)
        --unk UNK             Try to phonetize unknown words (default: True)
        --usestdtokens USESTDTOKENS
                              Phonetize from standard spelling (default: False)
      This program is part of SPPAS version 2.4. Copyright (C) 2011-2019 Brigitte
      Bigi. Contact the author at: contact@sppas.org
Examples of use
Obviously, before launching the following commands, you already prepared the required file (the result of text normalization segmented into IPUs).
Example of the phonetization of a single input file in manual mode:
python .\sppas\bin\phonetize.py -r .\resources\dict\eng.dict
        -i .\samples\samples-eng\oriana1-token.xra --quiet
          Phones
          0.000000, 1.675000, sil
          1.675000, 4.570000, {D-@|D-i:|D-V} f-l-aI-t {w-@-z|w-V-z|w-O:-z|w-A-z} t-w-E-l-v
          {aU-3:r-z|aU-r\-z} l-O:-N {{-n-d|@-n-d} w-i: {r\-I-l-i:|r\-i:-l-i:} g-A-t b-O:-r\-d
          4.570000, 6.390000, sil
          6.390000, 9.870000, D-eI @U-n-l-i: p-l-eI-d t-u m-u-v-i:-z sil {h-w-I-tS|w-I-tS}
          w-i: h-{-d b-@U-T {O:-l-r\-E-4-i:|O:-r\-E-4-i:} s-i:-n
          9.870000, 11.430000, sil
          11.430000, 14.730000, aI n-E-v-3:r {g-I-t|g-E-t} {t-@|t-i|t-u} s-l-i:-p
          {O:-n|A-n} {D-@|D-i:|D-V} E-r\-p-l-eI-n {b-i-k-O:-z|b-i-k-V-z} {i-t-s|I-t-s}
          s-@U @-n-k-V-m-f-3:r-4-@-b-@-l
          14.730000, 17.792000, sil
The same file in automatic mode can be annotated with one of the following commands:
python .\sppas\bin\phonetize.py -l eng -I .\samples\samples-eng\oriana1-token.xra
      python .\sppas\bin\phonetize.py -l eng -I .\samples\samples-eng\oriana1.xra
      python .\sppas\bin\phonetize.py -l eng -I .\samples\samples-eng\oriana1.txt
      python .\sppas\bin\phonetize.py -l eng -I .\samples\samples-eng\oriana1.wav
      python .\sppas\bin\phonetize.py -l eng -I .\samples\samples-eng\oriana1
This program can also phonetize data from the standard input. Example of use, using stdin/stdout under Windows:
Write-Output "The flight was 12 HOURS {toto} long." |
python .\sppas\bin\normalize.py -r .\resources\vocab\eng.vocab --quiet |
python .\sppas\bin\phonetize.py -r .\resources\dict\eng.dict --quiet
D-@|D-V|D-i:
f-l-aI-t
w-A-z|w-V-z|w-@-z|w-O:-z
t-w-E-l-v
aU-3:r-z|aU-r\-z
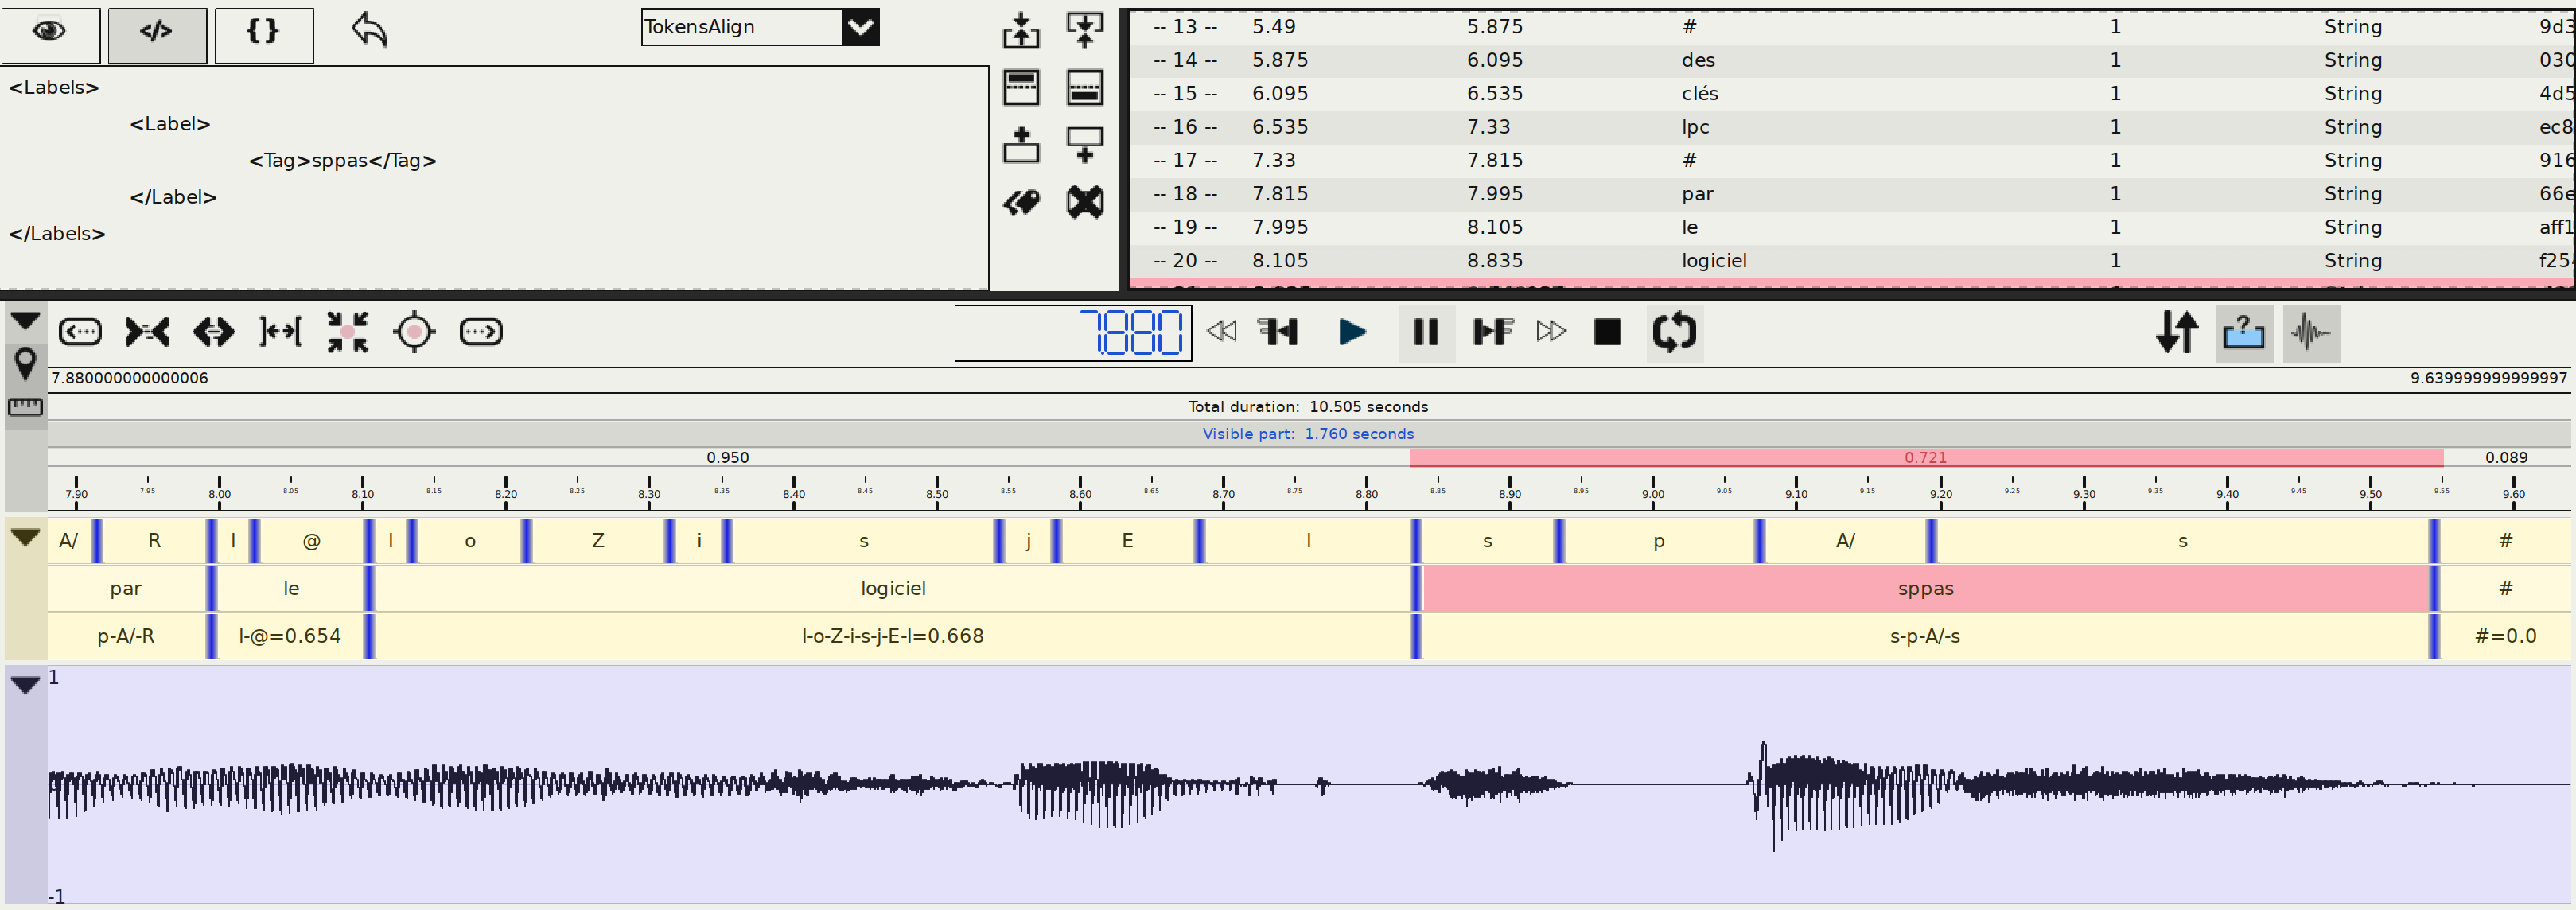
l-O:-NAlignment
Overview
Alignment, also called phonetic segmentation, is the process of aligning speech with its corresponding transcription at the phone level. The alignment problem consists in a time-matching between a given speech unit along with a phonetic representation of the unit.
SPPAS Alignment does not perform the segmentation itself. It
is a wrapper either for the Julius Speech Recognition
Engine (SRE) or for the HVite command of
HTK-Toolkit. In addition, SPPAS can perform a basic
alignment, assigning the same duration to each sound.
Speech Alignment requires an Acoustic Model to align speech.
An acoustic model is a file that contains a statistical representation of
every distinct sound ine a given language. Each sound is represented
by one of these statistical representations. The quality of the
alignment result only depends on both this resource and on the aligner.
From our experiences, we got better results with Julius. See the
chapter 4 Resources for Automatic Annotations
to get the list of
sounds of each language.
Notice that SPPAS allows to time-align automatically laugh, noises, or filled pauses (depending on the language): No other system is able to achieves this task!
Adapt Alignment
The better Acoustic Model, the better alignment results. Any user can
append or replace the acoustic models included in the models
folder of the resources
directory. Be aware that SPPAS only
supports HTK-ASCII acoustic models, trained from 16 bits, 16000 Hz wave
files.
The existing models can be improved if they are re-trained with more data. To get a better alignment result, any new data is then welcome: send an e-mail to the author to share your recordings and transcripts.
Support of a new language
The support of a new language in Alignment only consists in adding a new acoustic model of the appropriate format, in the appropriate directory, with the appropriate phone set.
The articulatory representations of phonemes are so similar across languages that phonemes can be considered as units which are independent of the underlying language (Schultz et al. 2001). In SPPAS package, 9 acoustic models of the same type - i.e., same HMMs definition and acoustic parameters, are already available so that the phoneme prototypes can be extracted and reused to create an initial model for a new language.
Any new model can also be trained by the author, as soon as enough data is available. It is challenging to estimate exactly the amount of data a given language requires. That is said, we can approximate the minimum as follows:
- 3 minutes altogether of various speakers, manually time-aligned at the phoneme level.
- 10 minutes altogether of various speakers, time-aligned at the ipus level with the enriched orthographic transcription.
- more data is good data.
Perform Alignment with the GUI
It is an annotation of STANDALONE type.
The Alignment process takes as input one or two files that strictly
match the audio file name except for the extension and that -phon
is appended for the first one and -token
for the optional second
one. For example, if the audio file name is oriana1.wav
, the
expected input file name is oriana1-phon.xra
with phonetization
and optionally oriana1-token.xra
with text normalization, if .xra
is the default extension for annotations.
The speech segmentation process provides one file with name
-palign
appended to its name, i.e. oriana1-palign.xra
for
the previous example. This file includes one or two tiers:
PhonAlign
is the segmentation at the phone level;TokensAlign
is the segmentation at the word level (if a file with tokenization was found).
The following options are available to configure Alignment:
- choose the speech segmentation system. It can be either: julius, hvite or basic
- perform basic alignment if the aligner failed, instead such intervals are empty.
- remove working directory will keep only alignment results: it will remove working files. Working directory includes one wav file per unit and a set of text files per unit.
- create the PhnTokAlign will append anoter tier with intervals of the phonetization of each word.
To perform the annotation, click on the Alignment activation button,
select the language and click on the Configure…
blue text to fix
options.
Perform Alignment with the CLI
alignment.py is the program to perform automatic speech
segmentation of a given phonetized file.
Usage
alignment.py [files] [options]
      Alignment: Time-alignment of speech audio with its corresponding transcription
      at the phone and token levels. Requires a Phonetization.
      optional arguments:
        -h, --help            show this help message and exit
        --quiet               Disable the verbosity
        --log file            File name for a Procedure Outcome Report (default: None)
      Files (manual mode):
        -i file               Input wav file name.
        -p file               Input file name with the phonetization.
        -t file               Input file name with the tokenization.
        -o file               Output file name with estimated alignments.
      Files (auto mode):
        -I file               Input transcription file name (append).
        -l lang               Language code (iso8859-3). One of: cat cmn deu eng
                              eng-cd fra ita jpn kor nan pcm pol por spa yue.
        -e .ext               Output file extension. One of: .xra .TextGrid .eaf
                              .csv .mrk .txt .stm .ctm .lab .mlf .sub .srt .antx
                              .arff .xrff
      Resources:
        -r model              Directory of the acoustic model of the language of the
                              text
        -R model              Directory of the acoustic model of the mother language
                              of the speaker (under development)
      Options:
        --inputpattern INPUTPATTERN
                              Input file pattern (phonetization) (default: -phon)
        --inputoptpattern INPUTOPTPATTERN
                              Optional input file pattern (tokenization) (default:
                              -token)
        --outputpattern OUTPUTPATTERN
                              Output file pattern (default: -palign)
        --aligner ALIGNER     Speech automatic aligner system (julius, hvite,
                              basic): (default: julius)
        --basic BASIC         Perform basic alignment if the aligner fails (default:
                              False)
        --clean CLEAN         Remove working directory (default: True)
        --activity ACTIVITY   Create the Activity tier (default: True)
        --activityduration ACTIVITYDURATION
                              Create the ActivityDuration tier (default: False)
      This program is part of SPPAS version 2.4. Copyright (C) 2011-2019 Brigitte
      Bigi. Contact the author at: contact@sppas.org
Example of use
Obviously, before launching the following command, you already prepared the required file (the result of phonetization) and the optional file (the result of text normalization segmented into IPUs).
python .\sppas\bin\alignment.py -I .\samples\samples-eng\oriana1.wav -l eng
          2018-12-19 18:33:38,842 [INFO] Logging set up level=15
          2018-12-19 18:33:38,844 [INFO] Options
          2018-12-19 18:33:38,844 [INFO]  ... activityduration: False
          2018-12-19 18:33:38,845 [INFO]  ... activity: True
          2018-12-19 18:33:38,845 [INFO]  ... aligner: julius
          2018-12-19 18:33:38,845 [INFO]  ... clean: True
          2018-12-19 18:33:38,845 [INFO]  ... basic: False
          2018-12-19 18:33:38,845 [INFO] File oriana1.wav: Valid.
          2018-12-19 18:33:38,845 [INFO] File oriana1-phon.xra: Valid.
          2018-12-19 18:33:38,846 [INFO] File oriana1-token.xra: Valid.
          2018-12-19 18:33:38,846 [WARNING]  ... ... A file with name
     E:\bigi\Projets\sppas\samples\samples-eng\oriana1-palign.xra is already existing. It will be
     overridden.
          2018-12-19 18:33:38,855 [INFO]  ... Découpage en intervalles.
          2018-12-19 18:33:38,901 [INFO]  ... Intervalle numéro 1.
          2018-12-19 18:33:38,904 [INFO]  ... Intervalle numéro 2.
          2018-12-19 18:33:38,908 [INFO]  ... Intervalle numéro 3.
          2018-12-19 18:33:38,913 [INFO]  ... Intervalle numéro 4.
          2018-12-19 18:33:38,917 [INFO]  ... Intervalle numéro 5.
          2018-12-19 18:33:38,921 [INFO]  ... Intervalle numéro 6.
          2018-12-19 18:33:38,926 [INFO]  ... Intervalle numéro 7.
          2018-12-19 18:33:38,928 [INFO]  ... Fusion des alignements des intervalles.
          2018-12-19 18:33:38,969 [INFO]  ... Création de la tier des activités.
          2018-12-19 18:33:38,993 [INFO]  ... E:\bigi\Projets\sppas\samples\samples-
     eng\oriana1-palign.xra
Activity
Overview
Activity tier represents speech activities, i.e. speech, silences, laughter, noises… It is based on the analysis of the time-aligned tokens.
Perform Activity with the GUI
It is an annotation of STANDALONE type.
The Activity process takes as input a file that strictly match the
audio file name except for the extension and that -palign
is
appended. For example, if the audio file name is oriana1.wav
, the
expected input file name is oriana1-palign.xra
if .xra is the
default extension for annotations. This file must include time-aligned
phonemes in a tier with name PhonAlign
.
The annotation provides an annotated file with -activity
appended to its name, i.e. oriana1-activity.xra
for the previous
example. This file is including 1 or 2 tiers: Activity,
ActivityDuration.
To perform the annotation, click on the Activity activation button
and click on the Configure…
blue text to fix options.
Perform Activity with the CLI
No CLI is available for this annotation.
RMS
Overview
The Root-Mean Square - RMS is a measure of the power in an audio signal. It is estimated from the amplitude values by: sqrt(sum(S_i^2)/n).
RMS automatic annotation estimates the rms value on given intervals
of an audio file. Empty intervals, i.e., intervals without labels, are
ignored. By default, the RMS is estimated on a tier with name
PhonAlign
of an annotated file with pattern -palign
. Both
can be modified by configuring the annotations. The annotation provides
an annotated file with -rms
pattern in its name. This file is
including three tiers:
- RMS: indicates the RMS value estimated on each non-empty interval;
- RMS-values: indicates RMS values estimated every 10 ms in each interval;
- RMS-mean: indicates the mean of the previous values.
Perform RMS with the GUI
It is an annotation of STANDALONE type.
To perform the annotation, click on the RMS activation button and
click on the Configure…
blue text to fix options.
Perform RMS with the CLI
rms.py is the program to perform this annotation, either
on a single given file (-i and -t) or on a set of files (-I).
Formants
Overview
The Formants Annotation module estimates the first two formant frequencies (F1 and F2) for each labeled interval of an audio file. Formants are key acoustic features that correspond to resonant frequencies of the vocal tract, and are especially relevant for the characterization of vowels.
The annotation is performed on a selected tier (by default: PhonAlign
) from
an annotated file with pattern -palign
. Intervals without labels are ignored.
The resulting annotations are saved in a file named with the -formants
pattern.
Several estimation methods are available, including:
- Auto-correlation: implemented in SPPAS;
- Burg: implemented in SPPAS;
- Praat-Burg: estimated by Praat via the Parselmouth Python interface.
The result file contains two main tiers:
- F1: estimated F1 values for each relevant interval;
- F2: estimated F2 values for each relevant interval.
If multiple estimation methods are selected, all values are included in the same annotation, allowing comparative analysis or averaging strategies.
Perform the annotation with the GUI
It is an annotation of STANDALONE type.
To perform the annotation, click on the Formants activation button and
click on the Configure…
blue text to fix options, including the
estimation methods.
Perform the annotation with the CLI
formants.py is the program to perform this annotation, either
on a single given file (-i and -t) or on a set of files (-I).
Anonymization
Overview
This automatic annotation allows to buzz intervals by doing the 3 following actions:
- replace the content of the annotated interval by
buzz
, and do it also on the corresponding intervals of all tiers in the given file; - make the audio segment incomprehensible – if enabled;
- blur the detected face or mouth areas of the video – if enabled.
This annotation is useful to anonymize a corpus by buzzing proper names, places, etc. It is also useful to buzz some bad language like coarse expressions.
There are many parameters allowing to buzz a bunch of intervals given in any tier, of any file. Such parameters for the annotated file with the intervals are:
- inputpattern: The pattern of the file which contain the intervals to
be selected. It’s default value is
-palign
which contains time-aligned tokens and phonemes. - buzztier: The name of the tier with intervals to be buzzed can be
fixed. By default,
TokensAlign
is used, but any other tier can be used. - buzzname: This is the pattern to find when filtering the intervals
of the tier. By default, this pattern is
$
. It can be any character or string. - buzzfilter: This is the name of the filter to be applied to select
buzzed intervals. By default, the
contains
filter is used. It means that the system will select any interval containing the given pattern.
The parameters for the video file corresponding to the given annotated file are:
- inputpattern2: The pattern of the video file. By default, no pattern
is given, but it could be
-identid001
for example. - buzzvideo: It is the mode of the video anonymization. It must be one
of: none, face or mouth. By default,
face
is used. When choosingmouth
, only the bottom part of the face is blur. Choosingnone
turns off the video anonymization.
The parameters for the audio file corresponding to the given annotated file are:
- inputpattern3: The pattern of the audio file. By default, no pattern is given.
- buzzaudio: This is to turn on or off the anonymization of the audio file.
Filtering the intervals
The following filters are proposed to select the intervals which are be to anonymized:
exact
: An annotation is selected if its label strictly corresponds to the given pattern.contains
: An annotation is selected if its label contains the given pattern.startswith
: An annotation is selected if its label starts with the given pattern.endswith
: An annotation is selected if its label ends with the given pattern.
When prepending a not
to the name of the filter, all these
matches can be reversed to represent respectively: does not
exactly match, does not contain, does not start with or does not end
with.
Moreover, the pattern matching can be case-sensitive - by default, or
case-insensitive by adding the letter i
before the name
of the filter, like iexact
or icontains
.
Finally, the filter regexp
is also available for the pattern
to match the annotation label with a regular expression.
Here is the full list of allowed filters:
exact
, contains
, startswith
, endswith
,
regexp
, iexact
, icontains
, istartswith
,
iendswith
, not_exact
, not_contains
,
not_startswith
, not_endswith
, not_iexact
,
not_icontains
, not_istartswith
, not_iendswith
.
Anonymization of the audio
The selected audio segments are anonymized, which means the original
content can’t be heard, and it can’t get back by a reverse process. The
implemented algorithm allows preserving the intensity, but the pitch
values are lost. If preserving the F0 is important, the Praat script
anonymise_long_sound.praat
is a better solution. It was written
by Daniel Hirst and is freely available here: https://www.ortolang.fr/market/tools/sldr000526. It can
be used with the buzzed tier - by SPPAS, as input.
Perform Anonymization with the GUI
It is an annotation of STANDALONE type.
To perform the annotation, click on the Anonymization activation
button and click on the Configure…
blue text to fix options.
Perform Anonymization with the CLI
anonymize.py is the program to perform this annotation.
For example, the -anonym
files of the demo were obtained using
the following command-line:
                     > .sppaspyenv~/bin/python3 ./sppas/bin/anonymize.py
               -I demo/demo.mp4
               --buzzname="é"
               --buzzvideo=mouth
               -e .TextGrid
The tiers with the tokens and the phonemes will be buzzed
in
all tokens containing the character é
. The audio is buzzed during
these intervals, and so does the detected mouth(s) of the video.
Interval Values Analysis - IVA
Overview
The Interval Values Analysis - IVA is producing statistical information about a set of values in given intervals. IVA can, for example, estimate the mean/stdev values on given intervals (IPUs, …) of a pitch file. Empty intervals, i.e., unlabeled intervals, are ignored, and a list of tags to be ignored can be fixed.
By default, the IVA is estimated with the values of a PitchTier
inside the intervals defined in a tier with name TokensAlign
of a
file with pattern -palign
. If a list of separators is given, the
intervals are created: an IVA segment is a set of consecutive
annotations without separators. Default separators are # + @ *
dummy
in order to ignore silences, laughter items, noises and
untranscribed speech. However, if no separator is given, IVA segments
are matching the intervals of the given input tier. In the latter case,
be aware that some file formats - including TextGrid, are not supporting
holes: they create unlabelled intervals between the labeled ones.
Both tiernames and patterns can be modified by configuring the
annotation. The annotation provides an annotated file with the
-iva
pattern. This file includes the tiers:
- IVA-Segments: defined intervals;
- IVA-Values: the values extracted for each segment;
- IVA-Occurrences: indicates the number of values in each segment;
- IVA-Total: indicates the sum of values in each segment;
- IVA-Mean: indicates the mean of values in each segment;
- IVA-Median: indicates the median of values in each segment;
- IVA-StdDev: indicates the standard deviation of values in each segment;
- IVA-Intercept: indicates the intercept value of the linear regression of values of each segment;
- IVA-Slope: indicates the slope value of the linear regression of values of each segment.
Perform IVA with the GUI
It is an annotation of STANDALONE type.
To perform the annotation, click on the IVA activation button and
click on the Configure…
blue text to fix options.
Perform IVA with the CLI
iva.py is the program to perform this annotation, either
on a single given file (-i and -s) or on a set of files (-I).
Lexical Metric
Overview
The Lexical Metric is producing information about the number of occurrences and the rank of each occurrence in annotation labels.
By default, the lexical metrics are estimated on a tier with name
TokensAlign
of a file with pattern -palign
. If a list of
separators is given, segments are created to estimate a number of
occurrences. Default separators are # + @ * dummy
in order to
ignore silences, laughter items, noises and untranscribed speech.
Both the tiername and the pattern can be modified by configuring the
annotation. The annotation provides an annotated file with the
-lexm
pattern. This file includes the tiers:
- LM-OccAnnInSegments: defined intervals with number of occurrences of annotations;
- LM-OccLabInSegments: defined intervals with number of occurrences of labels;
- LM-Occ: the number of occurrences in each label the annotation is representing;
- LM-Rank: the rank of each label the annotation is representing.
Perform Lexical Metric with the GUI
It is an annotation of STANDALONE type.
To perform the annotation, click on the Lexical Metric activation
button and click on the Configure…
blue text to fix options.
Syllabification
Overview
The syllabification of phonemes is performed with a rule-based system from time-aligned phonemes. This phoneme-to-syllable segmentation system is based on 2 main principles:
- a syllable contains a vowel, and only one;
- a pause is a syllable boundary.
These two principles focus the problem of the task of finding a syllabic boundary between two vowels. Phonemes were grouped into classes and rules are established to deal with these classes.

For each language, the automatic syllabification requires a configuration file to fix phonemes, classes and rules.
Adapt Syllabification
Any user can change the set of rules by editing and modifying the
configuration file of a given language. Such files are located in the
folder syll
of the resources
directory. Files are all with
UTF-8 encoding and LF
for
newline.
At first, the list of phonemes and the class symbol associated with each of the phonemes are described as, for example:
PHONCLASS e VPHONCLASS p P
Each association phoneme/class definition is made of three columns: the first one is the key-word PHONCLASS, the second is the phoneme symbol (like defined in the tier with the phonemes, commonly X-SAMPA), the last column is the class symbol. The constraints on this definition are that a class-symbol is only one upper-case character, and that the character X if forbidden, and the characters V and W are reserved for vowels.
The second part of the configuration file contains the rules. The first column is a keyword, the second one describes the classes between two vowels and the third column is the boundary location. The first column can be:
GENRULEEXCRULEOTHRULE.
In the third column, a 0
means the boundary is just after the
first vowel, 1
means the boundary is one phoneme after the first
vowel, etc. Here are some examples of the file for French language:
GENRULE VXV 0GENRULE VXXV 1EXCRULE VFLV 0EXCRULE VOLGV 0
Finally, to adapt the rules to specific situations that the rules
failed to model, we introduced some phoneme sequences and the boundary
definition. Specific rules contain only phonemes or the symbol
ANY
which means any phoneme. It consists of seven columns: the first
one is the key-word OTHRULE, the five following columns are a phoneme
sequence where the boundary should be applied to the third one by the
rules, the last column is the shift to apply to this boundary. In the
following example:
OTHRULE ANY ANY p s k -2
More information are available in (Bigi et al. 2010).
Support of a new language
The support of a new language in this automatic syllabification only consists in adding a configuration file (see previous section). Fix properly the encoding (utf-8) and newlines (LF) of this file; then fix the name and extension of the file as follows:
syllConfig-
followed by language name with iso639-3 standard,- with extension
.txt
.
Perform Syllabification with the GUI
It is an annotation of STANDALONE type.
The Syllabification process takes as input a file that strictly match
the audio file name except for the extension and that -palign
is
appended. For example, if the audio file name is oriana1.wav
, the
expected input file name is oriana1-palign.xra
if .xra is the
default extension for annotations. This file must include time-aligned
phonemes in a tier with name PhonAlign
.
The annotation provides an annotated file with -salign
appended to its name, i.e. oriana1-salign.xra
for the previous
example. This file is including two tiers: SyllAlign, SyllClassAlign.
Optionally, the program can add a tier with the syllable structures (V,
CV, CCV…).
To perform the annotation, click on the Syllabification activation
button, select the language and click on the Configure…
blue text
to fix options.
Perform Syllabification with the CLI
syllabify.py is the program to perform automatic
syllabification of a given file with time-aligned phones.
Usage
syllabify.py [files] [options]
          Syllabification: Syllabification is based on a set of rules to convert
          phonemes into classes and to group them. Requires time-aligned phones.
          optional arguments:
            -h, --help            show this help message and exit
            --quiet               Disable the verbosity
            --log file            File name for a Procedure Outcome Report (default: None)
          Files (manual mode):
            -i file               Input time-aligned phonemes file name.
            -o file               Output file name with syllables.
          Files (auto mode):
            -I file               Input transcription file name (append).
            -l lang               Language code (iso8859-3). One of: fra ita pol.
            -e .ext               Output file extension. One of: .xra .TextGrid .eaf
                                  .csv .mrk .txt .stm .ctm .lab .mlf .sub .srt .antx
                                  .arff .xrff
          Resources:
            -r rules              Configuration file with syllabification rules
          Options:
            --inputpattern INPUTPATTERN
                                  Input file pattern (time-aligned phonemes) (default:
                                  -palign)
            --outputpattern OUTPUTPATTERN
                                  Output file pattern (default: -syll)
            --usesphons USESPHONS
                                  Syllabify inside the IPU intervals (default: True)
            --usesintervals USESINTERVALS
                                  Syllabify inside an interval tier (default: False)
            --tiername TIERNAME   Tier name for such interval tier: (default:
                                  TokensAlign)
            --createclasses CREATECLASSES
                                  Create a tier with syllable classes (default: True)
          This program is part of SPPAS version 2.4. Copyright (C) 2011-2019 Brigitte
          Bigi. Contact the author at: contact@sppas.org
Examples of use
 python .\sppas\bin\syllabify.py -i .\samples\samples-fra\F_F_B003-P8-palign.xra
     -r .\resources\syll\syllConfig-fra.txt --quiet
      SyllAlign
      2.497101 2.717101 j-E-R
      2.717101 2.997101 s-w-A/-R
      ...
      19.412000 19.692000 P-L-V-P
      19.692000 20.010000 P-V-L-P
All the following commands will produce the same result:
 python .\sppas\bin\syllabify.py -I .\samples\samples-fra\F_F_B003-P8-palign.xra -l fra
 python .\sppas\bin\syllabify.py -I .\samples\samples-fra\F_F_B003-P8.TextGrid -l fra
 python .\sppas\bin\syllabify.py -I .\samples\samples-fra\F_F_B003-P8.wav -l fra
 python .\sppas\bin\syllabify.py -I .\samples\samples-fra\F_F_B003-P8 -l fra
TGA - Time Groups Analyzer
Overview
TGA is originally available at http://wwwhomes.uni-bielefeld.de/gibbon/TGA/. It’s a tool developed by Dafydd Gibbon, emeritus professor of English and General Linguistics at Bielefeld University.
Dafydd Gibbon (2013). TGA: a web tool for Time Group Analysis, Tools and Resources for the Analysis of Speech Prosody, Aix-en-Provence, France, pp. 66-69.
The original TGA is an online batch processing tool that provides a parametrized mapping from time-stamps in speech annotation files in various formats to a detailed analysis report with statistics and visualizations. TGA software calculates, inter alia, mean, median, rPVI, nPVI, slope and intercept functions within inter-pausal groups, provides visualization of timing patterns, as well as correlations between these, and parses inter-pausal groups into hierarchies based on duration relations. Linear regression is selected mainly for the slope function, as a first approximation to examining acceleration and deceleration over large data sets.
The TGA online tool was designed to support phoneticians in basic statistical analysis of annotated speech data. In practice, the tool provides not only rapid analyses but also the ability to handle larger data sets than can be handled manually.
In addition to the original one, a second version of TGA was implemented in the AnnotationPro software:
Katarzyna Klessa, Dafydd Gibbon (2014). Annotation Pro + TGA: automation of speech timing analysis, 9th International conference on Language Resources and Evaluation (LREC), Reykjavik (Iceland). pp. 1499-1505, ISBN: 978-2-9517408-8-4.
The integrated Annotation Pro + TGA tool incorporates some TGA
features and is intended to support the development of more robust and
versatile timing models for a greater variety of data. The integration
of TGA statistical and visualization functions into Annotation Pro+TGA
results in a powerful computational enhancement of the
existing AnnotationPro phonetic workbench, for supporting experimental
analysis and modeling of speech timing.
So, what’s the novelty into the third version implemented into SPPAS…
First of all, it has to be noticed that TGA is only partly implemented into SPPAS. The statistics analyses tool of SPPAS allows to estimates TGA within the SPPAS framework; and it results in the following advantages:
- it can read either TextGrid, csv, Elan, or any other file format supported by SPPAS,
- it can save TGA results in any of the annotation file supported by SPPAS,
- it estimates the two versions of the linear regression
estimators: the original one and the one implemented into
AnnotationPro:
- in the original TGA, the x-axis is based on positions of syllables,
- in the AnnotationPro+TGA, the x-axis is based on time-stamps.
Result of TGA into SPPAS
The annotation provides an annotated file with -tga
appended
to its name, i.e. oriana1-tga.xra
for the example. This file is
including 10 tiers:
- TGA-TimeGroups: intervals with the time groups
- TGA-TimeSegments: same intervals, indicate the syllables separated by whitespace
- TGA-Occurrences: same intervals, indicate the number of syllables
- TGA-Total: same intervals, indicate interval duration
- TGA-Mean: same intervals, indicate mean duration of syllables
- TGA-Median: same intervals, indicate median duration of syllables
- TGA-Stdev: same intervals, indicate stdev of duration of syllables
- TGA-nPVI: same intervals, indicate nPVI of syllables
- TGA-Intercept: same intervals, indicate the intercept
- TGA-Slope: same intervals, indicate the slope
Both tiers 9 and 10 can be estimated in two ways (so two more tiers can be generated).
Perform TAG with the GUI
It is an annotation of STANDALONE type.
The TGA process takes as input a file that strictly match the audio
file name except for the extension and that -salign
is appended.
For example, if the audio file name is oriana1.wav
, the expected
input file name is oriana1-salign.xra
if .xra is the default
extension for annotations. This file must include time-aligned syllables
in a tier with name SyllAlign
.
To perform the annotation, click on the TGA activation button and
click on the Configure…
blue text to fix options.
Perform TGA with the CLI
tga.py is the program to perform TGA of a given file
with time-aligned syllables.
Usage
tga.py [files] [options]
  TimeGroupAnalysis: Proposed by D. Gibbon, Time Group Analyzer calculates mean,
  median, nPVI, slope and intercept functions within inter-pausal groups.
  Requires time aligned syllables.
  optional arguments:
    -h, --help            show this help message and exit
    --quiet               Disable the verbosity
    --log file            File name for a Procedure Outcome Report (default: None)
  Files (manual mode):
    -i file               An input time-aligned syllables file.
    -o file               Output file name with TGA.
  Files (auto mode):
    -I file               Input time-aligned syllables file (append).
    -e .ext               Output file extension. One of: .xra .TextGrid .eaf
                          .csv .mrk .txt .stm .ctm .lab .mlf .sub .srt .antx
                          .arff .xrff
  Options:
    --original ORIGINAL   Use the original estimation of intercept and slope
                          (default: False)
    --annotationpro ANNOTATIONPRO
                          Use the estimation of intercept and slope proposed in
                          AnnotationPro (default: True)
    --tg_prefix_label TG_PREFIX_LABEL
                          Prefix of each time group label: (default: tg_)
    --with_radius WITH_RADIUS
                          Duration estimation: Use 0 to estimate syllable
                          durations with midpoint values, use -1 for Radius-, or
                          1 for Radius+. (default: 0)
  This program is part of SPPAS version 2.0. Copyright (C) 2011-2019 Brigitte
  Bigi. Contact the author at: contact@sppas.org
Example of use
python .\sppas\bin\tga.py -i .\samples\samples-fra\F_F_B003-P8-syll.xra
      2018-12-20 08:35:21,219 [INFO] Logging set up level=15
      TGA-TimeGroups
      2.497101 5.683888 tg_1
      5.743603 8.460596 tg_2
      9.145000 11.948531 tg_3
      12.494000 13.704000 tg_4
      13.784000 15.036000 tg_5
      16.602000 20.010000 tg_6
      TGA-TimeSegments
      ...
      13.784000 15.036000 -0.03063
      16.602000 20.010000 0.00468
Other commands:
python .\sppas\bin\tga.py -I .\samples\samples-fra\F_F_B003-P8-syll.xra
  python .\sppas\bin\tga.py -I .\samples\samples-fra\F_F_B003-P8.TextGrid
  python .\sppas\bin\tga.py -I .\samples\samples-fra\F_F_B003-P8.wav
Stop words
Create a tier with True/False indicating if a token is a stop-word or not.
Self-Repetitions
Overview
This automatic detection focus on word self-repetitions which can be exact repetitions (named strict echos) or repetitions with variations (named non-strict echos). The system is based only on lexical criteria. The algorithm is focusing on the detection of the source.
This system can use a list of stop-words in a given language. This is a list of the most frequent words like adjectives, pronouns, etc. The result of the automatic detection is significantly better if such a list of stopwords is available.
Optionnally, SPPAS can add new stop-words in the list: they are deduced from the given data. These new entries in the stop-list are then different for each file (Bigi et al. 2014).
The annotation provides one annotated file with two to four tiers:
- TokenStrain: if a replacement file was available, it’s the entry used by the system
- StopWord: if a stop-list was used, it indicates if the token is a stop-word (True or False)
- SR-Sources: tags of the annotations are prefixed by
S
followed an index - SR-Repetitions: tags of the annotations are prefixed by
R
followed an index
Adapt to a new language
The list of stop-words of a given language must be located in the
vocab
folder of the resources
directory with .stp
extension. This file is with UTF-8 encoding and LF
for
newline.
Perform Self-Repetitions with the GUI
It is an annotation of STANDALONE type.
The automatic annotation takes as input a file with (at least) one tier containing the time-aligned tokens. The annotation provides one annotated file with two tiers: Sources and Repetitions.
Click on the Self-Repetitions activation button, select the language
and click on the Configure…
blue text to fix options.
Perform SelfRepetitions with the CLI
selfrepetition.py is the program to perform automatic
detection of self-repetitions.
Usage
selfrepetition.py [files] [options]
  Self-repetitions: Self-repetitions searches for sources and echos of a
  speaker. Requires time-aligned tokens.
  optional arguments:
    -h, --help            show this help message and exit
    --quiet               Disable the verbosity
    --log file            File name for a Procedure Outcome Report (default: None)
  Files (manual mode):
    -i file               Input time-aligned tokens file name.
    -o file               Output file name with syllables.
  Files (auto mode):
    -I file               Input transcription file name (append).
    -e .ext               Output file extension. One of: .xra .TextGrid .eaf
                          .csv .mrk .txt .stm .ctm .lab .mlf .sub .srt .antx
                          .arff .xrff
  Resources:
    -r file               List of stop-words
  Options:
    --inputpattern INPUTPATTERN
                          Input file pattern (time-aligned words or lemmas)
                          (default: -palign)
    --outputpattern OUTPUTPATTERN
                          Output file pattern (default: -srepet)
    --span SPAN           Span window length in number of IPUs (default: 3)
    --stopwords STOPWORDS
                          Add stop-words estimated from the given data (default:
                          True)
    --alpha ALPHA         Coefficient to add data-specific stop-words (default:
                          0.5)
  This program is part of SPPAS version 3.0. Copyright (C) 2011-2020 Brigitte
  Bigi. Contact the author at: contact@sppas.org
Examples of use
python .\sppas\bin\selfrepetition.py -i .\samples\samples-fra\F_F_B003-P8-palign.xra
     -r .\resources\vocab\fra.stp
  python .\sppas\bin\selfrepetition.py -I .\samples\samples-fra\F_F_B003-P8.wav -l fra
Other-Repetitions
Overview
This automatic detection focus on other-repetitions, which can be either exact repetitions (named strict echos) or repetitions with variations (named non-strict echos). The system is based only on lexical criteria (Bigi et al. 2014). Notice that the algorithm is focusing on the detection of the source.
This system can use a list of stopwords in a given language. This is a list of frequent words like adjectives, pronouns, etc. The result of the automatic detection is significantly better if such a list of stopwords is available.
Optionnaly, SPPAS can add new stop-words in the list: they are deduced from the given data. These new entries in the stop-list are then different for each file (see Bigi et al. 2014).
The detection of the ORs is performed in a span window of N IPUs; by
default, N is fixed to 5. It means that if a repetition is after these N
IPUs, it won’t be detected. Technically, it also means that SPPAS needs
to identify the boundaries of the IPUs from the time-aligned tokens: the
tier must indicate the silences with the #
symbol.
A file with the following tiers will be created:
- OR-Source: intervals with the number of the sources
- OR-SrcStrain: intervals with the tokens of the sources
- OR-SrcLen: intervals with the number of tokens in the source
- OR-SrcType: intervals with the type of the echos of the sources
- OR-Echo: intervals with the number of the echos
Adapt to a language and support of a new one
This system can use a list of stopwords in a given language.
It must be located in the vocab
folder of the resources
directory with .stp
extension.
This file is with UTF-8
encoding and LF
for
newline.
Perform Other-Repetitions with the GUI
It is an annotation of INTERACTION type.
The automatic annotation takes as input a file with (at least) one tier containing the time-aligned tokens of the main speaker, and another file/tier with tokens of the interlocutor. The annotation provides one annotated file with two tiers: Sources and Repetitions.
Click on the Other-Repetitions activation button, select the language
and click on the Configure…
blue text to fix options.
Perform Other-Repetitions with the CLI
usage: otherrepetition.py -r stopwords [files] [options]Files:
  -i file               Input file name with time-aligned tokens of the main
                          speaker.
    -s file               Input file name with time-aligned tokens of the
                          echoing speaker
    -o file               Output file name with ORs.
Options:
  --inputpattern INPUTPATTERN
                          Input file pattern (time-aligned words or lemmas)
                          (default: -palign)
    --outputpattern OUTPUTPATTERN
                          Output file pattern (default: -orepet)
    --span SPAN           Span window length in number of IPUs (default: 3)
    --stopwords STOPWORDS Add stop-words estimated from the given data
                          (default: True)
    --alpha ALPHA         Coefficient to add data-specific stop-words
                          (default: 0.5)
Re-Occurrences
This annotation is searching for re-occurrences of an annotation of a speaker in the next N annotations of the interlocutor. It is originally used for gestures in (M. Karpinski et al. 2018).
Maciej Karpinski, Katarzyna Klessa Methods, Tools and Techniques for Multimodal Analysis of Accommodation in Intercultural Communication CMST 24(1) 29–41 (2018), DOI:10.12921/cmst.2018.0000006
Perform Re-Occurrences with the GUI
The automatic annotation takes as input any annotated file with (at least) one tier, and another file+tier of the interlocutor. The annotation provides one annotated file with 2 tiers: Sources and Repetitions.
Click on the Re-Occurrences activation button, and click on the
Configure…
blue text to fix options.
Perform Re-Occurrences with the CLI
usage: reoccurrences.py [files] [options]Files:
  -i file               Input file name with time-aligned annotations of
                          the main speaker.
    -s file               Input file name with time-aligned annotations of
                          the interlocutor
    -o file               Output file name with re-occurrences.
Options:
  --inputpattern INPUTPATTERN
                          Input file pattern (default: )
    --outputpattern OUTPUTPATTERN
                          Output file pattern (default: -reocc)
    --tiername TIERNAME   Tier to search for re-occurrences (default: )
    --span SPAN           Span window length in number of annotations (default:
                          10)
This program is part of SPPAS version 2.4. Copyright (C) 2011-2019 Brigitte Bigi. Contact the author at: contact@sppas.org
Momel (modelling melody)
Momel is an algorithm for the automatic modeling of fundamental frequency (F0) curves using a technique called asymetric modal quadratic regression.
This technique makes it possible by an appropriate choice of parameters to factor an F0 curve into two components:
- a macro-prosodic component represented by a a quadratic spline function defined by a sequence of target points < ms, hz >.
- a micro-prosodic component represented by the ratio of each point on the F0 curve to the corresponding point on the quadratic spline function.
For details, see the following reference:
Daniel Hirst and Robert Espesser (1993). Automatic modelling of fundamental frequency using a quadratic spline function. Travaux de l’Institut de Phonétique d’Aix. vol. 15, pages 71-85.
The SPPAS implementation of Momel requires a file with the F0 values sampled at 10 ms. Two file formats are supported:
.PitchTier
, from Praat..hz
, from any tool. It is a file with one F0 value per line.
The following options can be fixed:
- Window length used in the
cible
method - F0 threshold: Maximum F0 value
- F0 ceiling: Minimum F0 value
- Maximum error: Acceptable ratio between two F0 values
- Window length used in the
reduc
method - Minimal distance
- Minimal frequency ratio
- Eliminate glitch option: Filter f0 values before
cible
Perform Momel with the GUI
It is an annotation of STANDALONE type.
Click on the Momel activation button then click on the
Configure…
blue text to fix options.
Perform Momel with the CLI
momel.py is the program to perform Momel annotation of a
given file with F0 values sampled at 10ms.
Usage
momel.py [files] [options]
  Momel: Proposed by D. Hirst and R. Espesser, Momel - Modelling of fundamental
  frequency (F0) curves is using a technique called assymetric modal quaratic
  regression. Requires pitch values.
  optional arguments:
    -h, --help       show this help message and exit
    --quiet          Disable the verbosity
    --log file       File name for a Procedure Outcome Report (default: None)
  Files (manual mode):
    -i file          Input file name (extension: .hz or .PitchTier)
    -o file          Output file name (default: stdout)
  Files (auto mode):
    -I file          Input file name with pitch (append).
    -e .ext          Output file extension. One of: .xra .TextGrid .eaf .csv
                     .mrk .txt .stm .ctm .lab .mlf .sub .srt .antx .arff .xrff
  Options:
    --outputpattern OUTPUTPATTERN
                          Output file pattern (default: -momel)
    --win1 WIN1      Target window length (default: 30)
    --lo LO          F0 threshold (default: 50)
    --hi HI          F0 ceiling (default: 600)
    --maxerr MAXERR  Maximum error (default: 1.04)
    --win2 WIN2      Reduce window length (default: 20)
    --mind MIND      Minimal distance (default: 5)
    --minr MINR      Minimal frequency ratio (default: 0.05)
  This program is part of SPPAS version 2.4. Copyright (C) 2011-2019 Brigitte
  Bigi. Contact the author at: contact@sppas.rg
Examples of use
python .\sppas\bin\momel.py -i .\samples\samples-eng\ENG_M15_ENG_T02.PitchTier
      2018-12-19 15:44:00,437 [INFO] Logging set up level=15
      2018-12-19 15:44:00,674 [INFO]  ... ... 41 anchors found.
      1.301629 109.285503
      1.534887 126.157058
      1.639614 143.657446
      1.969234 102.911464
      2.155284 98.550759
      2.354162 108.250869
      2.595364 87.005994
      2.749773 83.577924
      2.933222 90.218382
      3.356651 119.709142
      3.502254 104.104568
      3.707747 132.055286
      4.000578 96.262109
      4.141915 93.741407
      4.383332 123.996736
      4.702203 89.152708
      4.987086 101.561180
      5.283864 87.499710
      5.538984 92.399690
      5.707147 95.411586
      5.906895 87.081095
      6.705373 121.396919
      7.052992 130.821479
      7.218415 120.917642
      7.670083 101.867028
      7.841935 109.094053
      8.124574 90.763267
      8.455182 114.261067
      8.746016 93.704705
      9.575359 101.108444
      9.996245 122.488120
      10.265663 105.244429
      10.576394 94.875460
      11.730570 99.698799
      12.083323 124.002313
      12.411790 108.563104
      12.707442 101.928297
      12.963805 113.980850
      13.443483 90.782781
      13.921939 90.824376
      14.377324 60.126506
Apply Momel on all files of a given folder:
python .\sppas\bin\momel.py -I .\samples\samples-engINTSINT: Encoding of F0 anchor points
INTSINT assumes that pitch patterns can be adequately described using a limited set of tonal symbols, T,M,B,H,S,L,U,D (standing for : Top, Mid, Bottom, Higher, Same, Lower, Up-stepped, Down-stepped respectively) each one of which characterises a point on the fundamental frequency curve.
The rationale behind the INTSINT system is that the F0 values of pitch targets are programmed in one of two ways : either as absolute tones T, M, B which are assumed to refer to the speaker’s overall pitch range (within the current Intonation Unit), or as relative tones H, S, L, U, D assumed to refer only to the value of the preceding target point.
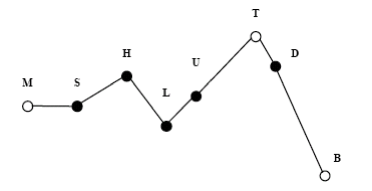
The rationale behind the INTSINT system is that the F0 values of pitch targets are programmed in one of two ways : either as absolute tones T, M, B which are assumed to refer to the speaker’s overall pitch range (within the current Intonation Unit), or as relative tones H, S, L, U, D assumed to refer only to the value of the preceding target point.
A distinction is made between non-iterative H, S, L and iterative U, D relative tones since in a number of descriptions it appears that iterative raising or lowering uses a smaller F0 interval than non-iterative raising or lowering. It is further assumed that the tone S has no iterative equivalent since there would be no means of deciding where intermediate tones are located.
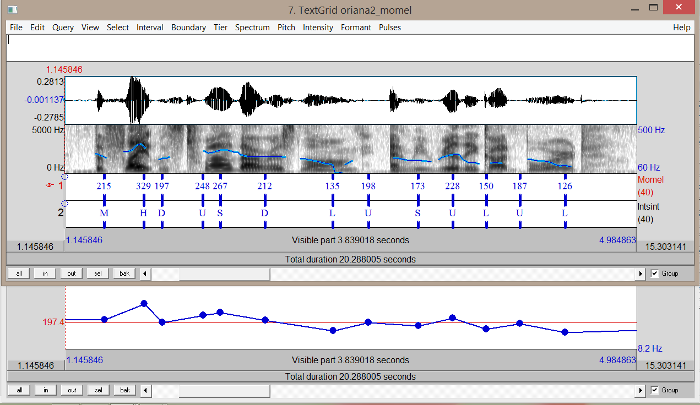
D.-J. Hirst (2011). The analysis by synthesis of speech melody: from data to models, Journal of Speech Sciences, vol. 1(1), pages 55-83.
Perform INTSINT with the GUI
It is an annotation of STANDALONE type.
Click on the INTSINT activation button and click on the
Configure…
blue text to fix options.
Perform INTSINT with the CLI
intsint.py is the program to perform INTSINT annotation
of a given file with momel anchors.
Usage
intsint.py [files] [options]
  INTSINT: INternational Transcription System for INTonation codes the
  intonation of an utterance by means of an alphabet of 8 discrete symbols.
  Requires Momel targets.
  optional arguments:
    -h, --help  show this help message and exit
    --quiet     Disable the verbosity
    --log file  File name for a Procedure Outcome Report (default: None)
  Files (manual mode):
    -i file     Input file name with anchors.
    -o file     Output file name (default: stdout)
  Files (auto mode):
    -I file     Input file name with anchors (append).
    -e .ext     Output file extension. One of: .xra .TextGrid .eaf .csv .mrk
                .txt .stm .ctm .lab .mlf .sub .srt .antx .arff .xrff
  Options:
    --inputpattern INPUTPATTERN
                          Input file pattern (momel anchors) (default: -momel)
    --outputpattern OUTPUTPATTERN
                          Output file pattern (default: -intsint)
  This program is part of SPPAS version 2.4. Copyright (C) 2011-2019 Brigitte
  Bigi. Contact the author at: contact@sppas.org
Examples of use
Apply INTSINT on a single file and print the result on the standard output:
python .\sppas\bin\intsint.py -i .\samples\samples-eng\ENG_M15_ENG_T02-momel.xra --quiet
      1.301629 M
      1.534887 U
      1.639614 H
      1.969234 L
      2.155284 S
      2.354162 U
      2.595364 L
      2.749773 S
      2.933222 S
      3.356651 H
      3.502254 D
      3.707747 H
      4.000578 L
      4.141915 S
      4.383332 H
      4.702203 L
      4.987086 U
      5.283864 L
      5.538984 U
      5.707147 D
      5.906895 S
      6.705373 M
      7.052992 U
      7.218415 S
      7.670083 D
      7.841935 S
      8.124574 D
      8.455182 U
      8.746016 D
      9.575359 M
      9.996245 U
      10.265663 D
      10.576394 D
      11.730570 M
      12.083323 U
      12.411790 D
      12.707442 S
      12.963805 U
      13.443483 L
      13.921939 S
      14.377324 B
Apply INTSINT in auto mode:
python .\sppas\bin\intsint.py -I .\samples\samples-eng\ENG_M15_ENG_T02.wav
  python .\sppas\bin\intsint.py -I .\samples\samples-eng\ENG_M15_ENG_T02.PitchTier
  python .\sppas\bin\intsint.py -I .\samples\samples-eng\ENG_M15_ENG_T02-momel.xra
Hand&Pose
SPPAS is a wrapper for MediaPipe Hand detection and Mediapipe Pose detection. It also proposes a custom solution to detect right-left hands of a person.
Overview
MediaPipe Hands is a high-fidelity hand and finger tracking solution. It employs machine learning (ML) to infer 21 3D landmarks of a hand from just a single frame. MediaPipe Hands utilizes an ML pipeline consisting of multiple models working together: A palm detection model that operates on the full image and returns an oriented hand bounding box. A hand landmark model that operates on the cropped image region defined by the palm detector and returns high-fidelity 3D hand key points. For details about hand detection, see: https://google.github.io/mediapipe/solutions/hands.html
MediaPipe Pose is a Machine Learning solution for high-fidelity body pose tracking, inferring 33 3D landmarks. For details about pose detection, see: https://google.github.io/mediapipe/solutions/pose.html
Important:
- SPPAS is only exporting (x,y)
- SPPAS can export the results in either XRA or CSV formats.
Three detection mode
are available:
- hands only: when enabling hands and disabling pose, SPPAS is a simple wrapper for MediaPipe Hand detection. The result of the system is a list of 21 sights for each detected hand.
- pose only: when disabling hand detection and enabling pose detection, SPPAS is a simple wrapper for MediaPipe Pose detection. Notice that if several persons are on the image, it will detect only one human body. The result of the system is a list with 33 sights of the human body.
- hand&pose: when enabling both hand and pose, SPPAS is combining both pose detections and hand detections. It results in two lists of sights: the first list for the right hand and the second list of the left hand. Each list is made either of 21 sights if the hand was properly detected by the hand prediction system, or made of the four sights of the pose detection system.
Here is the match between the indexes with height sights of the pose detection and the sight's indexes of the hand detection:
- right hand: pose 16 is hand 0, pose 18 is hand 8, pose 20 is hand 20 and pose 22 is hand 4.
- left hand: pose 15 is hand 0, pose 17 is hand 8, pose 19 is hand 20 and pose 21 is hand 4.
Perform annotation with the GUI
It is a STANDALONE annotation.
The annotation process takes as input an image or a video file. To
perform the annotation, click on its activation button and click on the
Configure…
blue text to fix options.
Perform with the CLI
The CLI does not work on an image but video recordings only. To
perform this annotation on an image, use the script annotation.py
instead.
usage: handpose.py [files] [options]
  optional arguments:
    -h, --help            show this help message and exit
    --quiet               Disable the verbosity
    --log file            File name for a Procedure Outcome Report
                          (default: None)
  Files:
    -i file               Input video.
    -o file               Output base name.
    -I file               Input file name (append).
    -e .ext               Output file extension. One of: .mp4 .avi .mkv .mov
  Options:
    --inputpattern1 INPUTPATTERN1
                          Input pattern of the video file. (default: )
    --outputpattern OUTPUTPATTERN
                          Output file pattern with the sights. (default: -hands)
    --hand HAND           Enable hands detection. (default: True)
    --pose POSE           Enable pose detection -- for only one human body. (default: True)
    --csv CSV             Save points in a CSV file instead of XRA (default: False)
    --tag TAG             Draw points on the video (default: True)
    --folder FOLDER       Save result in a folder with image files -- if video input only (default:
 False)
Face Detection
This is a state-of-the-art implementation of face detection performed with freely available models and tools. We introduced an original method in order to use any or all of them and to combine their results. This combined result was not evaluated.
Overview
FaceDetection annotation allows searching for coordinates of faces in
an image or in all images of a video. It requires both to enable the
video
feature in the setup to install the external libraries
numpy
and opencv-contrib-python
. Optionally,
mediapipe
can also be installed. It also requires to check
facedetect
in the list of annotations to be installed at the time
of the setup.
On the basis of the detection methods implemented in the opencv library, SPPAS is able to use several systems and to combine their results. These systems are based on 2 different methods:
- an Artificial Neural Network (DNN);
- an Haar Cascade Classifier (HCC).
The linguistic resources of this annotation include two DNN models and two models for HCC (a frontal-face model and a profile-face one). SPPAS can also launch the MediaPipe face detection system which is much faster than the previous ones but results sounds worse.
By default, SPPAS launches two of these detectors: 1 DNN and 1 HCC, and it combines their results. This annotation is about 2.5x real time. Even if it can increase the quality of the final result, other models are not used by default because the detection is very slow: 15x real time to use all the five models. The options allow choosing the models to be used.
Result of Face Detection
There are several output files that can be created:
- a copy of the image/video with all the detected faces surrounded by a square indicating a confidence score;
- as many cropped image files as the number of detected faces;
- an XRA or a CSV file with coordinates and confidence score of each detected face.
There’s also the possibility to consider the selfie (portrait size) instead of the face.
Perform Face Detection with the GUI
It is a STANDALONE annotation.
The Face Detection process takes as input an image file and/or a
video. To perform the annotation, click on the FaceDetection activation
button and click on the Configure…
blue text to fix options.
Perform Face Detection with the CLI
facedetection.py is the program to perform Face
Detection annotation of a given media file.
Usage
usage: facedetection.py [files] [options]
  optional arguments:
    -h, --help            show this help message and exit
    --quiet               Disable the verbosity
    --log file            File name for a Procedure Outcome Report (default: None)
  Files:
    -i file               Input image.
    -o file               Output base name.
    -I file               Input file name (append).
    -r model              Model base name (.caffemodel or .xml models as wishes)
    -e .ext               Output file extension (image or video)
  Options:
    --inputpattern INPUTPATTERN
                          Input file pattern (default: )
    --nbest NBEST         Number of faces to select among those
                          detected (0=auto) (default: 0)
    --score SCORE         Minimum confidence score to select detected
                          faces (default: 0.2)
    --portrait PORTRAIT   Consider the portrait instead of the face in
                          outputs (default: False)
    --csv CSV             Save coordinates of detected faces in a CSV
                          file instead of XRA (default: False)
    --folder FOLDER       Save result in a folder with image files --
                          if video input only (default: False)
    --tag TAG             Surround the detected faces in the output
                          image (default: True)
    --crop CROP           Save detected faces in cropped images
                          (default: False)
    --width WIDTH         Resize all the cropped images to a fixed
                          width (0=no) (default: 0)
    --height HEIGHT       Resize all the cropped images to a fixed
                          height (0=no) (default: 0)
    --model:opencv_face_detector_uint8.pb MODEL
                          Enable the opencv's ANN TensorFlow model.
                          (default: True)
    --model:haarcascade_frontalface_alt.xml MODEL
                          Enable the opencv's HaarCascade Frontal face model.
                          (default: True)
    --model:res10_300x300_ssd_iter_140000_fp16.caffemodel MODEL
                          Enable the opencv's ANN Caffe model.
                          (default: False)
    --model:haarcascade_profileface.xml MODEL
                          Enable the opencv's HaarCascade Profile face model.
                          (default: False)
    --model:mediapipe MODEL:MEDIAPIPE
                          Enable the MediaPipe Face Detection system.
                          (default: False)
  This program is part of SPPAS version 4.2. Copyright (C) 2011-2021
  Brigitte Bigi. Contact the author at: contact@sppas.org
Examples of use
python3 ./sppas/bin/facedetection.py -I ./samples/faces/BrigitteBigi_Aix2020.png
 --tag=True --crop=True --csv=True --portrait=True
  [INFO] Logging redirected to StreamHandler (level=0).
  [INFO] SPPAS version 3.5
  [INFO] Copyright (C) 2011-2021 Brigitte Bigi
  [INFO] Web site: https://sppas.org/
  [INFO] Contact: Brigitte Bigi (contact@sppas.org)
  [INFO]  * * * Annotation step 0 * * *
  [INFO] Number of files to process: 1
  [INFO] Options:
  [INFO]  ... inputpattern:
  [INFO]  ... outputpattern: -face
  [INFO]  ... nbest: 0
  [INFO]  ... score: 0.2
  [INFO]  ... portrait: True
  [INFO]  ... csv: True
  [INFO]  ... tag: True
  [INFO]  ... crop: True
  [INFO]  ... width: 0
  [INFO]  ... height: 0
  [INFO] File BrigitteBigi_Aix2020.png: Valid.
  [INFO]  ...  ... 3 faces found.
  [INFO]  ... ./samples/faces/BrigitteBigi_Aix2020-face.jpg
It creates the following 5 files in the samples/faces folder:
- BrigitteBigi_Aix2020-face.jpg with the 3 detected faces sourrounded by a square and indicating the detection score
- BrigitteBigi_Aix2020_1-face.jpg: image of the face with the highest score
- BrigitteBigi_Aix2020_2-face.jpg: image of the face with the medium score
- BrigitteBigi_Aix2020_3-face.jpg: image of the face with the worse score
- BrigitteBigi_Aix2020-face.csv contains three lines with coordinates in columns 3-7 with (x,y) and (w,h) then the confidence score in column 8 ranging [0., 1.]
Notice that the image contains three faces and their positions are properly found.
Face Identity
This is a new and original automatic annotation, but it’s still in progress. It has to be evaluated.
Overview
Face Identity automatic annotation assigns a person identity to
detected faces of a video. It takes as input a video and a CSV file with
coordinates of the detected faces. It produces a CSV file with
coordinates of the identified faces. Assigned person's names are
id-00x
. Obviously, the CSV file can be edited, and such names can
be changed a posteriori.
This annotation requires enabling the video
feature in the
setup, because it requires the external python libraries numpy
and
opencv-contrib
.
No external resources are needed.
Perform annotation with the GUI
It is a STANDALONE annotation.
The Face Identity process takes as input a video file. To perform the
annotation, click on the Face Identity activation button and click on
the Configure…
blue text to fix options.
Perform with the CLI
faceidentity.py is the program to perform Face Identity
annotation of a given video file, if the corresponding CSV file with
detected faces is existing.
Usage
usage: faceidentity.py [files] [options]
  optional arguments:
    -h, --help            show this help message and exit
    --quiet               Disable the verbosity
    --log file            File name for a Procedure Outcome Report (default: None)
  Files:
    -i file               Input video.
    -c file               Input CSV file with face coordinates and sights.
    -o file               Output base name.
    -I file               Input file name (append).
    -e .ext               Output file extension. One of: .mp4 .avi .mkv
  Options:
    --inputpattern INPUTPATTERN
    --inputoptpattern INPUTOPTPATTERN (default: -face)
    --outputpattern OUTPUTPATTERN (default: -ident)
Face Landmarks
This is a state-of-the-art implementation of face landmark performed with freely available models and tools. We introduced a solution to combine the results when several methods are used. The combined result was not evaluated.
Overview
SPPAS is using both the MediaPipe Face Mesh and the OpenCV’s facial landmark API called Facemark. It includes three different implementations of landmark detection based on three different papers:
- FacemarkKazemi: This implementation is based on a paper titled
One Millisecond Face Alignment with an Ensemble of Regression Trees
by V.Kazemi and J. Sullivan published in CVPR 2014. - FacemarkAAM: This implementation uses an Active Appearance Model and
is based on the paper titled
Optimization problems for fast AAM fitting in-the-wild
by G. Tzimiropoulos and M. Pantic, published in ICCV 2013. - FacemarkLBF: This implementation is based a paper titled
Face alignment at 3000 fps via regressing local binary features
by S. Ren published in CVPR 2014.
The fundamental concept is that any person will have 68 particular points on the face (called sights). SPPAS is able to launch several of them and to combine their results in a single and hopefully better one. Actually, SPPAS is launching MediaPipe Face Mesh and extracting the 68 sights among the 468 that are detected; then this result is combined (weight=6) with the 68 sights of the LBF detection method (weight=1).
This annotation requires both to enable the video
feature in
the setupto install the external libraries numpy
and
opencv-contrib
, and to check facemark
in the list of
annotations to be installed. Two different models will be downloaded and
used: a Kazemi one and a LBF one.
Perform annotation with the GUI
It is a STANDALONE annotation.
The Face Sights process takes as input an image file and/or a video.
To perform the annotation, click on the Face Sights activation button
and click on the Configure…
blue text to fix options.
Perform with the CLI
usage: facesights.py [files] [options]
  optional arguments:
    -h, --help            show this help message and exit
    --quiet               Disable the verbosity
    --log file            File name for a Procedure Outcome Report
  Files:
    -i file               Input image.
    -o file               Output base name.
    -I file               Input file name (append).
    -r model              Landmark model name (Kazemi, LBF or AAM)
    -R model              FaceDetection model name
    -e .ext               Output file extension.
  Options:
    --inputpattern INPUTPATTERN
    --inputoptpattern INPUTOPTPATTERN (default: -face)
    --outputpattern OUTPUTPATTERN (default: -sights)
Cued speech - LfPC
This automatic annotation is currently under development.
It’s an in-progress project and currently only a Proof of Concept is distributed. It mustn’t be used neither for any final application nor evaluation.
Cued Speech annotation can only be used in order to test it and
  to contribute in the project.
Overview
Speech reading or lip-reading requires watching the lips of a speaker and is used for the understanding of the spoken sounds. However, various sounds have the same lip movement which implies a lot of ambiguities. In 1966, R. Orin Cornett invented the Cued Speech, a visual system of communication. It adds information about the pronounced sounds that are not visible on the lips.
Thanks to this code, speech reading is encouraged since the Cued Speech (CS) keys match all the spoken phonemes but phonemes with the same movement have different keys. Actually, from both the hand position on the face (representing vowels) and hand shapes, known as cues (representing consonants), CV syllables can be represented. So, a single CV syllable will be generated or decoded through both the lips position and the key of the hand.
LfPC is the French acronym for Langue française Parlée
Complétée
.
The conversion of phonemes into keys of CS is performed using a rule-based system. This RBS phoneme-to-key segmentation system is based on the only principle that a key is always of the form CV.
This annotation requires both to enable the video
feature in
the setup to install the external libraries numpy
and
opencv-contrib
and to check cuedspeech
in the list of
annotations.
Perform annotation with the GUI
It is a STANDALONE annotation.
The annotation process takes as input a -palign
file and
optionally a video. To perform the annotation, click on its activation
button and click on the Configure…
blue text to fix options.
Perform with the CLI
usage: cuedspeech.py [files] [options]
  optional arguments:
    -h, --help            show this help message and exit
    --quiet               Disable the verbosity
    --log file            File name for a Procedure Outcome Report
                          (default: None)
  Files:
    -i file               Input time-aligned phonemes file name.
    -v file               Input video file name.
    -o file               Output file name with Cued Speech key codes.
    -r rules              File with Cued Speech keys description
    -I file               Input file name (append).
    -l lang               Language code (iso8859-3). One of: fra.
    -e .ext               Output file extension. One of: .xra .TextGrid
                          .eaf .ant .antx .mrk .lab .srt .sub .vtt .ctm
                          .stm .csv .txt
  Options:
    --inputpattern1 INPUTPATTERN1
                          Pattern of the file with time-aligned phonemes
                          (default: -palign)
    --inputpattern2 INPUTPATTERN2
                          Pattern of the video file (default: )
    --inputpattern3 INPUTPATTERN3
                          Pattern of the file with sights of the face of
                          the person (default: -sights)
    --outputpattern OUTPUTPATTERN
                          Pattern of the output files (default: -cuedsp)
    --createvideo CREATEVIDEO
                          Tag the video with the code of the key
                          (needs video+csv) (default: False)